

Content from Introduction
Last updated on 2024-08-02 | Edit this page
Overview
Questions
- Who else is doing this course?
- What can you expect from this course?
Objectives
- Find out something interesting about other participants.
- Understand the way in which you are expected to behave and interact with other participants.
- Have an overview of the content and material that will be covered.
- Pair up with another participant to collaborate with during this workshop.
Git is, in 2024, the most widely used version control system by far. It was developed by Linus Torvalds to manage Linux kernel development and since then has exploded. Websites such as GitHub and GitLab make asynchronous collaboration on common code bases possible and underpin many, many software projects from enterprise grade tools such as the aforementioned Linux kernel, the increasingly popular Rust through to niche products such as Snapcast or Android apps for tracking your exercise such as OpenTracks.
Git and Forges, online repositories for working with Git, such as GitHub, GitLab SourceHut, Codeberg, and ForgeJo and so forth are wonderful tools for collaboration. However, because of the complexities of version controlling software in distributed, collaborative environments the tool itself, Git, has become quite complex. There are many different tasks that one may wish to undertake and often several different ways of achieving these.
Its relatively easy to get the basics of working with Git on your own or with small groups to work collaboratively on code development. If you aren’t already familiar with these basics then this course isn’t for you (yet!) and you would benefit from an introductory course such as Git, GitHub through GitKraken : From Zero to Hero! or the Software Carpentry : Version Control with Git. This course aims to show you some of the more involved ways to use Git in a collaborative environment.
Most of the ways in which collaboration can be eased is through a better understanding of how Git works and by maintaining clean and focused commits which make the task of reviewing work easier for those you are collaborating with.
Code of Conduct
To make clear what is expected, everyone participating in The Carpentries activities is required to abide by our Code of Conduct. Any form of behaviour to exclude, intimidate, or cause discomfort is a violation of the Code of Conduct. In order to foster a positive and professional learning environment we encourage you to:
- Use welcoming and inclusive language
- Be respectful of different viewpoints and experiences
- Gracefully accept constructive criticism
- Focus on what is best for the community
- Show courtesy and respect towards other community members
If you believe someone is violating the Code of Conduct, we ask that you report it to The Carpentries Code of Conduct Committee by completing this form.
Icebreaker
Collaboration
Since this course is all about collaboration we would like you now to pair up with another participant in order to undertake the exercises contained in this course. This could be the person sitting next to you if this is an in-person course or if the course is online one of the instructors will pair you up at random.
Once paired up please add details to the Etherpad along with your GitHub usernames.
Callout
The aim of pairing up is not to divide the tasks between people. There are a few exceptions but for most tasks you should work with your partner to solve each of the challenges, but with one person at the “driving seat” making the changes to the code as required.
You should discuss what you think the solution should be as you work through the challenge.
This is software development technique known as Pair Programming and by discussing the solutions you will hopefully come away with a better understanding of the material.
Getting to Know Each Other
In order to break the ice and find out something about the other participants on this course, please think about a situation BVC (Before Version Control) where you might have had a problem that Version Control would have prevented. This might be deleting files by mistake or making changes to code that broke your programme and not being unable to undo them.
If the course is being run in person please describe the situation to the person or people sat next to you. Write your answer in the collaborative pad under a heading with your name.
If you are participating online please write down your names of pairs and provide an answer in the collaborative notepad.
Cloning Repositories
Choose Roles, Clone Repository and
Introduce yourself to the person you have paired up with. You now need to decide who is to take on each of the two roles. There isn’t much between them in terms of what you will be doing but one person needs to be the repository owner and one person needs to be a collaborator.
Repository Owner
The Repository Owner should visit the Python Maths repository on GitHub. To avoid the default base branch being this repository we do not use templates. Instead the Repository owner should follow these steps to get a copy of the repository under their account.
- Use the
Codebutton of the Python Maths to clone the repository locally (git clone git@github.com:ns-rse/python-maths.git). - Fetch additional branches with
git fetch origin {divide,multiply,ns-rse/merge-conflict}. - On GitHub create an empty repository called
python-mathsusing the new repo, do not add a license or.gitignoreto the repository, it should be completely empty. - In the locally cloned
python-mathsdirectory open the.git/configfile and edit the line 7 that readsurl = git@github.com:ns-rse/python-maths.gitand replacens-rsewith your GitHub user name. E.g. if your GitHub username isalice_and_bobit should readurl = git@github.com:alice_and_bob/python-maths.git. Save these changes. - Force push with
git push --force.
This edit changes the origin to be the empty repository
you created under your account called python-maths
and pushes the cloned repository there.
Once you have completed this you need to invite your collaborator to work on the repository with you. Navigate to Settings > People and add invite you collaborator to the project.
Collaborator
You should accept the invitation you have received to work on the
Template the Repository Owner just sent you and clone their version of
the python-maths repository.
Install python-maths under the Virtual Environment
Both individuals should now have local copies of the repository.
After activating the git-collaboration Virtual Environment
you created during setup should install the package in editable mode
within the environment along with the test dependencies. If
you are not familiar with working with Python follow the instructions in
the Solutions below.
NB - Once cloned you may have to explicitly fetch
the multiply and divide branches, instructions
are in the solution.
Both the repository owner and collaborator should now clone the repository from the repository owners copy not the original template.
Click on the Code button and then the SSH tab. Copy
the URL. If you want to clone the work to ~/work/git/ then
in a terminal
Repository Owners
Just the repository owner should now edit the
.git/config and modify line 7 where the url of
the origin is defined replace ns-rse with their GitHub
username. For example if the repository owner uses the
alice_and_bob username on GitHub it should read.
BASH
 [remote "origin"]
     url = git@github.com:alice_and_bob/python-maths.git
     fetch = +refs/heads/*:refs/remotes/origin/*
Alternatively you can do this at the command line with…
The Repository Owner should create a new, empty, but public
repository on GitHub called python-maths, there is no need
to include a license nor .gitignore file.
The Repository Owner can push the cloned repository to their account
with, the --force is optional and shouldn’t be required
unless you have inadvertently initialised the repository with additional
files.
On the python-maths repository you both now have access
to protect the main branch to require approvals.
- Settings > Branches > Add branch protection rule
- Enter
mainunder Branch name pattern - Check the box Require a pull request before merging
- Prevent the repository owner from bypassing the rules by checking Do not allow bypassing the above settings.
- Save the changes using the button at the bottom of the page.
If you have not already done so activate the
git-collaboration environment you created as described in
the setup instructions.
You can now install the package and its test dependencies in an
editable format so that as you work on the package the changes you make
will instantly be available. Make sure you are in the
python-maths directory (use pwd to show where
you are and cd to change directory).
You can optionally check everything is installed and runs by running the tests via pytest
BASH
pytest
========================================== test session starts ==========================================
platform linux -- Python 3.11.8, pytest-8.1.1, pluggy-1.4.0
Matplotlib: 3.8.4
Freetype: 2.6.1
rootdir: /home/neil/work/teaching/git_collaboration/2024-04-19/python-maths
configfile: pyproject.toml
testpaths: tests
plugins: regtest-2.1.1, pylint-0.21.0, github-actions-annotate-failures-0.2.0, xdist-3.5.0, cov-5.0.0, anyio-4.3.0, mock-3.14.0, mpl-0.17.0
collected 26 items

tests/test_arithmetic.py ......................                                                   [ 84%]
tests/test_trig.py ....                                                                           [100%]

----------------------------------------- pytest-regtest report -----------------------------------------
total number of failed regression tests: 0

---------- coverage: platform linux, python 3.11.8-final-0 -----------
Name                        Stmts   Miss  Cover
-----------------------------------------------
pythonmaths/arithmetic.py       8      0   100%
pythonmaths/trig.py             4      0   100%
-----------------------------------------------
TOTAL                          12      0   100%

========================================== 26 passed in 0.28s ===========================================
After completing these steps you should both have a copy of the
python-maths repository on your local computer.
Callout
If desired you can between you update the Metadata in
pyproject.toml it is important to have accurate Metadata in
this file because if you ever publish your package to Python Package Index (PyPI) it will be
used.
To update the metadata create a branch and update lines 12 and 13 with your names and email addresses. Push the changes, create a pull request and merge the changes.
Content from Git Hygiene
Last updated on 2024-09-17 | Edit this page
Overview
Questions
- How do I configure Git globally and locally?
- How do we keep our repository and history clean?
- What are atomic commits?
- How do I avoid
Fixing typocommits?
Objectives
- Command line configuration of Git.
- Manually editing Git configuration files.
- Use
.gitignoreto avoid adding unnecessary files. - Understand the concept of Atomic commits.
- Ammending commits.
-
git absorbthe magic sponge! - Squashing commits.
- Automated maintenance.
Git Configuration
Git configuration comes in two forms, “global” and “local” and is
courtesy of some simple text files. The global configuration file lives
in your home directory and on GNU/Linux and OSX systems is
~/.gitconfig (on Windows it is
C:\Users\<username>\.gitconfig) and will have been
setup when you first attempted to use Git and were prompted for your
name and email address.
Each repository that is under Git version control has a
.git/ directory where all of the configuration, hooks and
history live. Within this directory you will find a
.git/config file which is the “local” configuration for
that repository. Configuration options defined locally over-ride global
configuration options.
There are two ways of modifying either the global or local
configuration, using the Command Line
git config <options> or by editing either the global
(~/.gitconfig) or local (git/config)
files.
git config
The git config command has a host of options that you
can view with the --help flag. The first required option
says what file should be modified and is typically either
global or local. You can view the
configuration with git config --list and you can optional
restrict it to either the --global or --local
configuration.
Adding values requires a bit of understanding about the structure of the configuration file, a very simple example is shown below.
BASH
[user]
 email = a.n.other@sheffield.ac.uk
 name = A N Other
[core]
 editor = nano
 sshCommand = ssh -i ~/.ssh/id_ed25519 -F /dev/null
 attributesFile = $HOME/.gitattributes
 autocrlf = input
 excludesfile = ~/dotfiles/git/.gitignore
Sections are in square brackets with names, e.g. [user]
or [core]. Fields then have key and value pairs e.g. the
name value is set to A N Other the
email address is a.n.other@sheffield.ac.uk and
the editor is set to nano and so forth.
To modify values you need to know the section and the key you want to
change, these are combined to give the third argument
user.email and you then provide the value you want it to be
as the fourth argument. For example to change the email address in the
global configuration you would.
Editing config files
You can also edit both the local (.git/config) and
global (~/.gitconfig) files directly to set configuration
options and this can at times be much quicker.
For example if we wanted to configure Git so that the order in which
branches are listed is by the most recent commit we could add the
following to our ~/.gitconfig using nano,
which will result in branches being listed in reverse chronological
order when you git branch --list.
Challenge 1
Add the fields user and email to the
github section of your global configuration setting them to
your GitHub username and your registered email address.
Alias’
A very useful configuration option available is the ability to set aliases
for Git. This means you can create short cuts to complex commands.
Aliases live under the [alias] section of the global
(.gitconfig) or local (.git/config)
configuration files. They can be set at the command line with
git config --[global|local] alias.<shortcut> <command>
.
If you wanted to save a few key strokes and set sw as an
alias for switch globally you would.
Or if you want to unstage files that are currently staged you can set
an unstage alias using the following where the command you
wish to add is put in quotes so the shell doesn’t think they are
arguments to the command and treats them as a string.
As with other configuration options you can also edit the configuration files directly to add the commands.
Challenge 2 - Set a git log
alias
git log shows the history of commits on the current
branch, but its default is quite verbose. Fortunately there are a
lot of options to modify the output adding colour, shortening
dates and including a graph. You can see all the options in the manual
(git log --help).
For this exercise add the following set of log options to an alias of
your choice (this course uses logp but you are free to set
it to whatever you want, e.g. lp)
.gitignore
The .gitignore
file does exactly what you might expect it to, it contains lists of
directories and files that should be ignored. To save having to write
out the path to each and every file the format accepts patterns.
This file, like many others uses # as a comment, to use a
# in a file name you therefore need to escape it with the
\ slash. A * matches anything but slashes and
leading/trailing ** match all directories (leading) or
everything within a directory (trailing). For more details
A common set of files you may want to ignore is the
.DS_Store directory that Mac OSX automatically generates in
most directories. Just as you can exclude files you can list directories
so add that to the .gitignore in the
python-maths repository now. Navigate to the directory and
open the file using nano
and add the following line.
It is often sensible to ensure data files are not included in your
repository. What these files might be depends on how you are working,
common formats are .csv for text files .RData
for files from R and
.pkl are the Python pickles.
GitHub has a useful feature when you create a repository to include
template .gitignore files for specific languages, but if
you missed out this step you can always use the .gitignore
generator to generate files to be ignored and copy and paste these
in.
The .gitignore file is part of the repository and is
itself version controlled, this means that its rules are applied
consistently across anyone who works on the project or a fork of it
(since forks may end up making contributions up-stream). You therefore
have to remember to stage and commit changes to the file just as you
would other files in the repository.
Challenge 3
In your pairs exclude files with the extension .csv and
.pkl from being added to the python-maths
project by adding the appropriate pattern to the .gitignore
file on a new branch and merge it into the main branch via
a pull-request, assigning it to the other person for review.
The following lines to .gitignore will ignore all files
with the extensions .csv and .pkl. The
wildcard symbol * is required to ensure any file,
no matter what comes before the extension is ignored.
OUTPUT
*.csv
*.pkl
Staging and committing, then pushing to GitHub
BASH
git switch main
git pull
git switch -c ns-rse/ignore-csv-pkl
git add .gitignore
git commit -m "chore: Ignoring .csv and .pkl files"
git push
Pull requests are created on GitHub.
difftastic
When undertaking Pull Requests on GitHub there is the ability to
toggle between two different
views of the differences. The standard view shows the changes
line-by-line and looks like the following where the deleted lines are
started with - signs and may well be in red and the added
lines are started with + and may well be in green. Changes
within a line are reflected as a deletion and addition.
BASH
@@ -1861,12 +1862,18 @@ tree -afhD -L 2 main/

 Each branch can have a worktree added for it and then when you want to switch between them its is simply a case of
-`cd`ing into the worktree (/branch) you wish to work on. You use Git commands within the directory to apply them to that
-branch and Git keeps track of everything in the usual manner.
+`cd`ing into the worktree (/branch) you wish to work on. You use Git commands within the worktree directory to apply
+them to that branch and Git keeps track of everything in the usual manner.

-Lets create two worktree's, the `contributing` and `citation` we created above when working with branches.
+###
+Lets create two worktree's, the `contributing` and `citation` we created above when working with branches. If you didn't
+already follow along the above steps do so now.
Its a matter of personal preference but it can sometimes be easier to
look at differences in the split view that difftastic
provides, the same changes above using the split view are shown
below.
BASH
1862                                                                            1863
1863 Each branch can have a worktree added for it and then when you want to swi 1864 Each branch can have a worktree added for it and then when you want to swi
.... tch between them its is simply a case of                                   .... tch between them its is simply a case of
1864 `cd`ing into the worktree (/branch) you wish to work on. You use Git comma 1865 `cd`ing into the worktree (/branch) you wish to work on. You use Git comma
.... nds within the directory to apply them to that                             .... nds within the worktree directory to apply
1865 branch and Git keeps track of everything in the usual manner.              1866 them to that branch and Git keeps track of everything in the usual manner.
1866                                                                            1867
....                                                                            1868 ###
1867 Lets create two worktree's, the `contributing` and `citation` we created a 1869 Lets create two worktree's, the `contributing` and `citation` we created a
.... bove when working with branches.                                           .... bove when working with branches. If you didn't
....                                                                            1870 already follow along the above
steps do so now.
Challenge 4
Install difftastic on your computer and configure Git globally to use it.
Hint There are instructions on the website.
The instructions show
the configuration options you can add to ~/.gitconfig to
setup an alias for git dft which uses
difftastic. The following in your .gitconfig
will set that up.
[diff]
        tool = difftastic

[difftool]
        prompt = false

[difftool "difftastic"]
        cmd = difft "$LOCAL" "$REMOTE"

[pager]
        difftool = true
# `git dft` is less to type than `git difftool`.
[alias]
        dft = difftool
Atomic Commits
The idea of atomic commits is that they are small self-contained commits focused on one issue, all the changes are typically in a small subset of files, e.g. only the a particular module and its associated test file. But you may have learnt to make lots of small commits frequently and so you’re history may look like.
BASH
git log --oneline
  0d2f520 Correct spelling
  325d038 Document function xyz
  86d7633 Add docstring to function xyz
  a58d6e7 Fix function xyz to pass tests
  9429ab4 Add test for function xyz
  bb560b0 Add function xyz
Here six commits have been made for adding the xyz
function, writing tests that pass, adding docstrings to the function and
correcting some spelling mistakes. But all of these pertain to one issue
that will have been written up on the projects issues and as the work is
self-contained and we’ve not added to any other files they could be a
single commit.
Git has a few functions to help here and we’ll go through those.
We’ll use the python-maths repository as an example and
will make a new branch to add a CONTRIBUTING.md file
to.
BASH
cd pytest-maths
git switch -c amend-fixup-tutorial
  Switched to a new branch 'amend-fixup-tutorial'
We now add a simple CONTRIBUTING.md file to the
repository.
BASH
echo "# Contributing\n\nContributions via pull requests are welcome." > CONTRIBUTING.md
git add CONTRIBUTING.md
git commit -m "docs: Adding CONTRIBUTING.md"Making Amends
Sometimes you will have made a commit and you realise that you want to add more to it or perhaps you forgot to run your test suite and find that on running it your tests fail so you need to make a correction. In this example we want to be more explicit about how to make contributions and let people know they should fork the branch.
BASH
echo "\nPlease make a fork of this repository, make your changes and open a Pull Request." >> CONTRIBUTING.mdNow you could make a second commit…
BASH
git logp
9f0655b (HEAD -> amend-fixup-tutorial) Ask for PRs via fork in CONTRIBUTING.md
01191a2 Adding CONTRIBUTING.md
…and there is nothing wrong with that. However, Git history can get
long and complicated when there are lots of small commits, because these
two changes to CONTRIBUTING.md are essentially the same
piece of work then If we’d been thinking clearly we would have written
about making forks in the first place and made a single commit.
Fortunately Git can help here as there is the
git commit --amend option which adds the staged changes to
the last commit and allows you to edit the last commit message (if
nothing is currently staged then you will be prompted to edit the last
commit message). We can undo the last commit using
git reset HEAD~1 (more on resetting later) and instead
amend the first commit that added the CONTRIBUTING.md
BASH
git logp
  4fda15f (HEAD -> amend-fixup-tutorial) Adding CONTRIBUTING.md
cat CONTRIBUTING.md
# Contributing

Contributions via pull requests are welcome.

Please make a fork of this repository, make your changes and open a Pull Request.
We now have one commit which contains the new
CONTRIBUTING.md file with all the changes we wished to have
in the file in the first place and our Git history is slightly more
compact.
git commit --fixup
Amending commits is great providing the commit you want to change is
the last commit you made (i.e. HEAD). But sometimes you
might wish to correct a commit further back in your history and
git commit --amend is of no use here. Git has a solution
though in the form of git commit --fixup command which
allows you to mark a commit as being a “fix up” of an older commit.
These can then be autosquashed via an interactive Git rebase.
Let’s add a few empty commits to our
amend-fixup-tutorial branch to so we can do this.
BASH
git commit --allow-empty -m "Empty commit for demonstration purposes"
git commit --allow-empty -m "Another empty commit for demonstration purposes"
BASH
git logp
  8061221 (HEAD -> amend-fixup-tutorial) Another empty commit for demonstration purposes
  65587ce Empty commit for demonstration purposes
  4fda15f Adding CONTRIBUTING.md
  35aa48c Previous commit before adding CONTRIBUTING.md
And let’s expand our CONTRIBUTING.md file further.
BASH
echo "\nPlease note this repository uses [pre-commit](https://pre-commit.com) to lint the Python code and Markdown files." >> CONTRIBUTING.mdWe want to merge this commit with the first one we made in this
tutorial using git commit --fixup. To do this we need to
know the hash (4fda15f see output from above
git logp). You then use
git commit --fixup <hash> to commit your changes as a
“fixup” of the earlier commit.
We see the commit we have just made starts with fixup!
and is then followed by the commit message that it is fixing, but it
hasn’t yet been combined into that commit.
BASH
git log --oneline
  97711a4 (HEAD -> amend-fixup-tutorial) fixup! Adding CONTRIBUTING.md
  8061221 Another empty commit for demonstration purposes
  65587ce Empty commit for demonstration purposes
  4fda15f Adding CONTRIBUTING.md
  35aa48c Previous commit before adding CONTRIBUTING.md
The final step is to perform the automatic squashing via an
interactive rebase. You need to supply the hash of the commit
before the one you are fixing up, in this case
35aa48c (check the output of git logp if you
haven’t made a note of this).
This will open the default editor and because the
--autosquash option has been used it should have marked the
commits that need combining with fixup. All you have to do
is save the file and exit and we can check the history and look at the
contents of the file.
NB If you find that the necessary commit isn’t already marked navigate then you are likely to have supplied the wrong hash (most probably the hash of the commit your wish to fixup rather than the commit before it).
BASH
git logp
  0fda21e (HEAD -> amend-fixup-tutorial) Another empty commit for demonstration purposes
  65587ce Empty commit for demonstration purposes
  4fda15f Adding CONTRIBUTING.md
  35aa48c Previous commit before adding CONTRIBUTING.md

cat CONTRIBUTING.md
  # Contributing

  Contributions via pull requests are welcome.

  Please make a fork of this repository, make your changes and open a Pull Request.

  Please note this repository uses [pre-commit](https://pre-commit.com) to lint the Python code and Markdown files.
And you’re all done! If you were doing this for real on a repository
you would now git push or continue your work. As this was
just an example we can switch branches back to main and
force deletion of the branch we created.
Challenge 4
In your pairs there are two issue templates in the
python-math repository that you are using.
- 03 Zero Division Amend and Fixup
- 04 Square Root Amend and Fixup
Create and assign one of these each and work through the stages. The
tasks build on material already covered e.g. creating and switching
branches and conventions for naming branches and rebasing. Solutions to
each step are provided but try not to use them instead you can use your
history to check what commands you have used.
The instructions should have guided you through.
On the main branch of your python-maths
repository the divide function in
pythonmaths/arithmetic.py should look like the following
with four examples.
PYTHON
def divide(x: int | float, y: int | float) -> float:
    """
    Divide x by y.

    Parameters
    ----------
    x : int | float
        Numerator for division.
    y : int | float
        Denominator for division.

    Returns
    -------
    float
        The result of dividing `x` by `y`.

    Examples
    --------
    >>> from python_math import arithmetic
    >>> arithmetic.divide(10, 2)
        5.0
    >>> arithmetic.divide(5, 2)
        2.5
    >>> arithmetic.divide(3, 0)
        You can not divide by 0, please choose another value for 'y'.
    >>> arithmetic.divide(1, 0.1)
        10
    """
    return x / y
The square_root function should look like the
following.
PYTHON
def square_root(x):
    """Return the square root of a number.

    Parameters
    ==========
    x : int | float
        The number for which you wish to find the square root.

    Returns
    =======
    float
        The square root of x.

    Examples
    ========
    >>> from python_math import arithmetic
    >>> arithmetic.square_root(4)
        2.0
    >>> arithmetic.square_root(169)
        13.0
    """
    if x < 0:
        print("WARNING : you have supplied a negative number, the square root is complex.")
    return (x) ** (1 / 2)
git absorb
Rather than having to look up commit hashes or work out how many
commits back you need to go to pass as an argument to
--fixup you can instead use the git-absorb extension
that works out what commits changes to each file being fixed up need
rebasing and with the --and-rebase flag it will
automatically perform the squashing rebase.
The steps involved then become much shorter with.
By default git absorb will search the last 10 commits
but this can be configured at runtime using the --base flag
to specify the last commit to check or by adapting the configuration
file.
Squashing commits
If you don’t want to use git-absorb and you
forgot to use git commit --fixup you can still combine
commits using an interactive rebase git rebase -i. We’ve
already touched on git rebase in the context of keeping
branches up-to-date but its a very flexible and powerful component of
Git and it also allows you to “squash” commits on the same branch.
We will now make a few commits to our branch and then squash them via
an interactive rebase. This helps keep commits that you will merge into
main atomic since even if you’ve been using
git commit --amend to sequentially update a commit you may
still have several commits on a branch which can be combined into a
single informative commit that is ready for merging into the
main branch.
Returning to the python-maths repository we will make a
series of empty commits on a new branch and then undertake an
interactive rebase to squash them.
BASH
git switch -c test-rebase
git commit --allow-empty -m "Commit 1"
git commit --allow-empty -m "Commit 2"
git commit --allow-empty -m "Commit 3"
git commit --allow-empty -m "Commit 4"
git commit --allow-empty -m "Commit 5"
git logp
To squash these commits we need to know the hash or relative
reference to the first commit we wish to interact with which the
git log command does (if you set the gl alias
earlier you can use that)
BASH
git logp
c33ab51 (HEAD -> test-rebase) Commit 5
f7bb1c9 Commit 4
d47d914 Commit 3
e859738 Commit 2
c437414 Commit 1
2f7c382 (origin/main) Merge pull request #6 from ns-rse/ns-rse/tidy-print
a1101c7 [pre-commit.ci] Fixing issues with pre-commit
The hash of the first commit we want to squash is
c437414 or HEAD~5) but you need to include it.
We start a rebase with git rebase -i c437414 which will
open our default editor.
BASH
pick c437414 Commit 1 # empty
pick e859738 Commit 2 # empty
pick d47d914 Commit 3 # empty
pick f7bb1c9 Commit 4 # empty
pick c33ab51 Commit 5 # empty

# Rebase c437414..c33ab51 onto c437414 (4 commands)
#
# Commands:
# p, pick <commit> = use commit
# r, reword <commit> = use commit, but edit the commit message
# e, edit <commit> = use commit, but stop for amending
# s, squash <commit> = use commit, but meld into previous commit
# f, fixup [-C | -c] <commit> = like "squash" but keep only the previous
#                    commit's log message, unless -C is used, in which case
#                    keep only this commit's message; -c is same as -C but
#                    opens the editor
# x, exec <command> = run command (the rest of the line) using shell
# b, break = stop here (continue rebase later with 'git rebase --continue')
# d, drop <commit> = remove commit
# l, label <label> = label current HEAD with a name
# t, reset <label> = reset HEAD to a label
# m, merge [-C <commit> | -c <commit>] <label> [# <oneline>]
#         create a merge commit using the original merge commit's
#         message (or the oneline, if no original merge commit was
#         specified); use -c <commit> to reword the commit message
# u, update-ref <ref> = track a placeholder for the <ref> to be updated
#                       to this position in the new commits. The <ref> is
#                       updated at the end of the rebase
#
# These lines can be re-ordered; they are executed from top to bottom.
#
# If you remove a line here THAT COMMIT WILL BE LOST.
#
# However, if you remove everything, the rebase will be aborted.
#
The instructions here are really useful and tell us how to edit the
rebase. The first line tells us that we are rebasing the range of
commits onto c437414. Subsequently there is a list of
commands, by default pick is in place for each of the
commits, but we are shown the available options and simply need to
replace each of the pick with s or
squash and we want to apply it to commits two through to
5.
You can do this manually by editing the file or you can use your
editors find and replace functionality which in nano is
Ctrl + \ and you will be prompted for the string you want
to find (pick) and what you want to replace it with
squash and then asked if you want to change the first
instance or all. We can safely change all as it doesn’t matter if the
instances in the comments section are replaced. The first four rows of
the file should now read like the following.
BASH
pick   c437414 Commit 1 # empty
squash e859738 Commit 2 # empty
squash d47d914 Commit 3 # empty
squash f7bb1c9 Commit 4 # empty
squash c33ab51 Commit 5 # empty
Save this file and exit (in nano use
Ctrl + o then Ctrl + x), the editor will exit
return you to the prompt and then in the blink of an eye open the editor
again with a different message. This is now your opportunity to edit the
commit message for the single commit that will remain in the tree, as
the notes show. Any lines starting with a # are comments
and will be ignored but this is very useful as it saves you having to
re-write all the text across the commits and you can instead edit
them.
BASH
# This is a combination of 5 commits.
# This is the 1st commit message:

Commit 1

# This is the commit message #2:

Commit 2

# This is the commit message #3:

Commit 3

# This is the commit message #4:

Commit 4

# This is the commit message #5:

Commit 5

# Please enter the commit message for your changes. Lines starting
# with '#' will be ignored, and an empty message aborts the commit.
#
# Date:      Fri Mar 8 14:39:47 2024 +0000
#
# interactive rebase in progress; onto 2f7c382
# Last commands done (5 commands done):
#    squash f7bb1c9 Commit 4 # empty
#    squash c33ab51 Commit 5 # empty
# No commands remaining.
# You are currently rebasing branch 'main' on '2f7c382'.
#
# No changes
Edit the file to read how you want it to, here I’ve gone with the following to make it clearly
BASH
Squash of empty commits 1-5

This is an example of how to squash commits and combines the original commits...

+ Commit 1
+ Commit 2
+ Commit 3
+ Commit 4
+ Commit 5
When done save and exit (in nano use
Ctrl + O then Ctrl + X). You should be
informed the rebase was successful and if you look at the plain
git log your commit message will be there at the top in all
its glory.
BASH
git rebase -i 2f7c382
[detached HEAD 2a0c155] Squash of empty commits 1-5
 Date: Fri Mar 8 14:39:47 2024 +0000
Successfully rebased and updated refs/heads/main.

git log

commit 2a0c1551039f8fd43af74656a6150e71254c6669 (HEAD -> main)
Author: Neil Shephard <n.shephard@sheffield.ac.uk>
Date:   2024-03-08 14:39:47 +0000

    Squash of empty commits 1-5

    This is an example of how to squash commits and combines the original commits...

    + Commit 1
    + Commit 2
    + Commit 3
    + Commit 4
    + Commit 5

commit 2f7c3826b310269b06dd86cca930bdd767ad9fbf (origin/main)
Merge: feee987 a1101c7
Author: Neil Shephard <n.shephard@sheffield.ac.uk>
Date:   2024-03-07 16:07:06 +0000

    Merge pull request #6 from ns-rse/ns-rse/tidy-print
Callout
When squashing commits they do not have to be contiguous, you can
pick and choose any combination. Commits that are prefixed with
pick will remain in the Git history.
Re-writing History - With Great Power
…comes great scope for messing things up!
The --amend, --fixup and
rebase -i commands we have worked through are powerful
tools, in effect they are re-writing the Git history that is shown in
the git log. You may have noticed that the commit hashes
change when using these commands.
If you have pushed your work to GitHub and then use any of these
commands to change the history of your branch locally the two will
differ and Git will complain and tell you that you need to
git pull first. If you know you want to push the changes
you can force them to be pushed using
git push --force-with-lease, however you should be
very careful doing so in some situations.
Callout
If anyone else has git pull the branch or if the changes
have been merged into main (or another branch) using these
commands then git push --force will cause a lot of
headaches so make sure no one else is working on your branches and don’t
force push to branches that have already been merged.
--force-with-lease offers some protection against the
problems that can arise and --force-if-includes help catch
if you haven’t git pull any changes that may be on the
origin.
The following resources are highly recommended reading on this topic.
Keep things tidy
Overtime the information about branches and commits can become bloated. We’ve seen how to delete branches already but there are a few other simple steps we can take to help keep the repository clean.
Maintenance
git maintenance
is a really useful command that will “Run tasks to optimize
Git repository data, speeding up other Git commands and reducing storage
requirements for the repository.”. The details of what this does
are beyond the scope of this tutorial (refer to the help page if
interested). Providing you have setup your GitHub account with SSH keys
and they are available via something such as keychain locally then you
can bring a repository under git maintenance and forget
about it.
This adds entries to your global configuration
(~/.gitconfig) to ensure the repository will have these
tasks run at the scheduled point (default is hourly).
Conventional Commits
You may have noticed in many of the commit messages used so far a keyword is used to start the commit followed by a colon. This is an example of Conventional Commits which are a standardised way of writing commit messages that, as with the branch naming convention suggested earlier, include metadata about what the commit relates to.
There are keywords to start your commit message with that are self-explanatory
fix:-
feat:- short for future build:chore:ci:docs:style:refactor:-
perf:- short for performance test:
If changes relate to a specific component or “scope” of a repository
that can be included in parentheses afterwards. For example the Zero
Division issue in python-maths relates to the
artihmatic module so might be started with
fix(arithmetic).
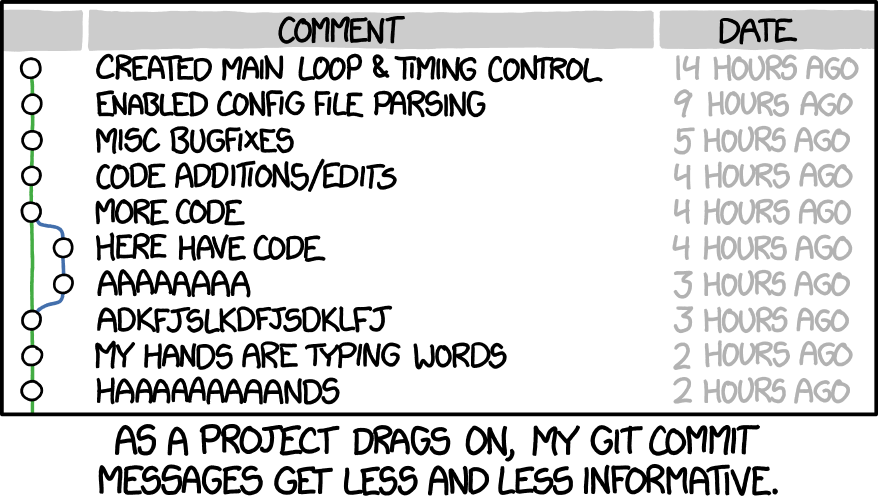
You don’t have to use Conventional Commits but do try and use informative titles and add more detail if needs be to your commit messages. You don’t want your history to look like this…
Key Points
- Global configuration is via
.gitconfig - Local configuration is via
.git/configand takes precedence over Global. - Configuration can be done at the command line or by editing files.
- Ignore files using
.gitignore. - Make commits atomic, i.e. small and focused using
git commit --amendandgit commit --fixup, better still make life easier usinggit absorb. -
git rebase --interactivecan be used to squash commits. - Keeping the commit history atomic and clean makes it easier to understand what work has been undertaken.
- Git periodically tidies things up for you with
git gc. - You can and should enable further automated cleaning by enabling
git mainenanceon a repository.
Links
- Atomic commits will help you git legit. – Pauline Vos the video of her talk is well worth watching.
- How to Write a Git Commit Message
- Why you need small, informative Git commits
- Hack your way to a good Git history · Maëlle’s R Blog
- So You Think You Know Git an excellent talk by Scot Chacon, one of the founders of GitHub and co-author of Pro Git book on useful tips for using Git.
- So You Think You Know Git Part 2 follow-on from previous video.
- Atlassian | Advanced Git Tutorials
Content from Branching
Last updated on 2024-11-11 | Edit this page
Overview
Questions
- What are branches?
- How do we use branches in git effectively?
- How can I check out other peoples branches whilst working on my own?
- How do I keep my development branch up-to-date with
main?
Objectives
- How branches can be used to fix bugs or develop features in isolation.
- Switching branches, stashing and restoring.
- How to keep a development branch up-to-date.
- Git worktrees instead of branches.
- Tracking multiple origins
Branches
Branches are key to working with version control as they allow the
development of new features or fixing of bugs without touching the
current working version of code. New features and bug fixes are then
merged into the main branch to update the code base, but
what is a branch?
The word suggests an analogy with trees where branches are parts of a tree the extend from the “main” trunk or recursively from parent “branches”. An intuitive model of this is shown in the figure below.
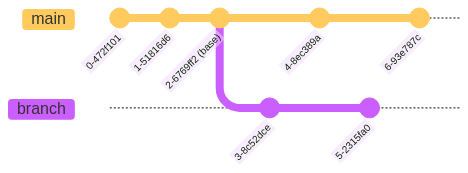
The branch has two commits on it and stems from the
parent main at a point referred to as base. A
branch is not just the two commits that appear to exist on it
(i.e. 3-8c52dce and 5-2315fa0) rather it is
the full commit history of that lineage including the commits in the
“parent”. That means the branch consists of the commits
0-472f101, 1-98f9a30 and
2-6769ff2 as well as 3-8c52dce and
5-2315fa0.
In a repository that is version controlled you will typically be
checked out on the HEAD of a named branch. The
HEAD means the most recent commit in the history of that
branch which on the branch is commit 5-2315fa0
whilst on main the HEAD is
6-93e787c.
You can change branches by using
git switch <branchname>.
Callout
git switch was introduced in Git
v2.23.0 along with git restore to provide two separate
commands for the functionality that was originally available in
git checkout. The main reason was to separate the
functionality of git checkout which could “switch”
branches, including creating branches using the
--branch/-b flag, and change (“restore”)
individual files with
git checkout [treeish] -- <filename> (more on this
later).
Splitting this functionality means that git switch is
solely for switching branches whilst
git restore is solely concerned with
restoreing files but is destructive and we will cover later
the git revert command as an alternative.
git checkout has not been deprecated and is still
available and many people still use it as old habits die hard.
Challenge 1: What is the first and last commit
on branch divide?
Using the python-maths repository you have cloned look
up the first and last commit of the divide branch.
What are the commit hashes, commit messages, date/time and committers names?
BASH
git switch divide
git log --pretty="%h %ad (%cr) %x09 %an : %s"
* 6353fb4 - (HEAD -> divide, origin/divide) bug: Fix tpyo in divide function (2024-03-26 10:28:36 +0000) <Neil Shephard>
* 7485e56 - chore: Fix merge conflict (2024-03-26 10:28:11 +0000) <Neil Shephard>
* adfef4d - feat: Divide branch (2024-03-25 15:55:15 +0000) <Neil Shephard>
* 400896a - Divide branch (2024-03-25 15:55:15 +0000) <Neil Shephard>
* c1f64b0 - Setting up the repository for git-collaboration (2024-02-02 15:48:50 +0000) <Neil Shephard>
*   fa76751 - (origin/main, main) Merge pull request #6 from RSE-Sheffield/ns-rse/5-setup-clean-up (2023-10-19 22:46:14 +0100) <Neil Shephard>
|\
| * c8f0697 - 5 | Removing comment from setup.cfg (2022-10-04 11:12:23 +0100) <Neil Shephard>
* |   aff8153 - Merge pull request #7 from RSE-Sheffield/subtract-mistake (2023-01-20 10:07:58 +0000) <bobturneruk>
|\ \
| |/
|/|
| * a45a8dd - introduce mistake in subtract issue (2023-01-20 09:50:03 +0000) <Robert (Bob) Turner>
| * 604a397 - introduce delibarate mistake (2022-12-21 10:29:34 +0000) <Robert (Bob) Turner>
|/
*   f06c0ab - Merge pull request #4 from RSE-Sheffield/simplify_deliberate_errors (2022-06-07 14:58:27 +0100) <David Wilby>
|\
| * f55c0d2 - remove missing colon and no newline deliberate errors (2022-05-06 11:50:24 +0100) <David Wilby>
|/
* 5c9ae75 - correct python testing instruction (2021-05-18 16:15:23 +0300) <Anna Krystalli>
* 86d7633 - add correct details to each issue (2021-05-18 16:01:50 +0300) <Anna Krystalli>
* a58d6e7 - add all github issue templates (2021-05-17 13:43:57 +0300) <Anna Krystalli>
* 9429ab4 - complete subtract issue template (2021-05-14 15:53:25 +0300) <Anna Krystalli>
* bb560b0 - simplify function (2021-05-14 15:53:01 +0300) <Anna Krystalli>
*   325d038 - Merge pull request #1 from RSE-Sheffield/tests_changes (2021-05-14 14:40:36 +0300) <Anna Krystalli>
|\
| * 608ad59 - Restructure so tests pass (2021-05-14 12:24:23 +0100) <Will Furnass>
|/
* 8584b0f - correct pull request branch spec (2021-05-14 12:45:21 +0300) <Anna Krystalli>
* cdc9ea3 - correct push branch specification (2021-05-14 12:40:01 +0300) <Anna Krystalli>
* c01ff62 - add instructions to README (2021-05-14 12:38:29 +0300) <Anna Krystalli>
* 585287a - add test and CI (2021-05-14 12:38:09 +0300) <Anna Krystalli>
* 3f4d54b - rename python_package folder (2021-05-14 12:37:48 +0300) <Anna Krystalli>
* 4b1707b - use requirements.txt instead of env.yml (2021-05-14 10:04:02 +0100) <davidwilby>
* 2556966 - remove build specs from conda env (2021-05-14 10:01:28 +0100) <davidwilby>
* b50e658 - move env.yml to right place.. (2021-05-14 09:54:59 +0100) <davidwilby>
*   0d2f520 - Merge branch 'main' of github.com:RSE-Sheffield/python-calculator into main (2021-05-14 09:53:44 +0100) <davidwilby>
|\
| * b1179a7 - add package name folder (2021-05-14 11:33:06 +0300) <Anna Krystalli>
* | c883789 - add conda environment yaml (2021-05-14 09:53:06 +0100) <davidwilby>
|/
* fdb8716 - draft commit (2021-05-14 11:23:42 +0300) <Anna Krystalli>
* 328e61b - Add subtraction issue template (2021-05-13 12:23:42 +0300) <Anna Krystalli>
* 31a4a93 - Initial commit (2021-05-13 12:14:08 +0300) <Anna Krystalli>
From the git log graph we see the first and last commits
were.
| Commit | Hash | Message | Date/time | Committer |
|---|---|---|---|---|
| First | 31a4a93 | Initial commit | 2021-05-13 12:14:08 | Anna Krystalli |
| Last | 6353fb4 | bug: Fix tpyo in divide function | 2024-03-26 10:28:36 | Neil Shephard |
Challenge 2: What commit did the
multiply branch diverge from master
?
Again using the python-maths repository switch to the
multiply. Use git log what is the commit that
multiply diverged from master. How many
commits have been made on the multiply branch?
BASH
git switch multiply
git log --graph --pretty="%h %ad (%cr) %x09 %an : %s"
* b702501 - (HEAD -> multiply, origin/multiply) bug: multiply instead of add arguments (2024-03-26 10:33:37 +0000) <Neil Shephard>
* 11e36a3 - feat: Adding multiply function and tests (2024-03-26 10:32:42 +0000) <Neil Shephard>
* c1f64b0 - Setting up the repository for git-collaboration (2024-02-02 15:48:50 +0000) <Neil Shephard>
*   fa76751 - (origin/main, main) Merge pull request #6 from RSE-Sheffield/ns-rse/5-setup-clean-up (2023-10-19 22:46:14 +0100) <Neil Shephard>
|\
| * c8f0697 - 5 | Removing comment from setup.cfg (2022-10-04 11:12:23 +0100) <Neil Shephard>
* |   aff8153 - Merge pull request #7 from RSE-Sheffield/subtract-mistake (2023-01-20 10:07:58 +0000) <bobturneruk>
|\ \
| |/
|/|
| * a45a8dd - introduce mistake in subtract issue (2023-01-20 09:50:03 +0000) <Robert (Bob) Turner>
| * 604a397 - introduce delibarate mistake (2022-12-21 10:29:34 +0000) <Robert (Bob) Turner>
|/
*   f06c0ab - Merge pull request #4 from RSE-Sheffield/simplify_deliberate_errors (2022-06-07 14:58:27 +0100) <David Wilby>
|\
| * f55c0d2 - remove missing colon and no newline deliberate errors (2022-05-06 11:50:24 +0100) <David Wilby>
|/
* 5c9ae75 - correct python testing instruction (2021-05-18 16:15:23 +0300) <Anna Krystalli>
* 86d7633 - add correct details to each issue (2021-05-18 16:01:50 +0300) <Anna Krystalli>
* a58d6e7 - add all github issue templates (2021-05-17 13:43:57 +0300) <Anna Krystalli>
* 9429ab4 - complete subtract issue template (2021-05-14 15:53:25 +0300) <Anna Krystalli>
* bb560b0 - simplify function (2021-05-14 15:53:01 +0300) <Anna Krystalli>
*   325d038 - Merge pull request #1 from RSE-Sheffield/tests_changes (2021-05-14 14:40:36 +0300) <Anna Krystalli>
|\
| * 608ad59 - Restructure so tests pass (2021-05-14 12:24:23 +0100) <Will Furnass>
|/
* 8584b0f - correct pull request branch spec (2021-05-14 12:45:21 +0300) <Anna Krystalli>
* cdc9ea3 - correct push branch specification (2021-05-14 12:40:01 +0300) <Anna Krystalli>
* c01ff62 - add instructions to README (2021-05-14 12:38:29 +0300) <Anna Krystalli>
* 585287a - add test and CI (2021-05-14 12:38:09 +0300) <Anna Krystalli>
* 3f4d54b - rename python_package folder (2021-05-14 12:37:48 +0300) <Anna Krystalli>
* 4b1707b - use requirements.txt instead of env.yml (2021-05-14 10:04:02 +0100) <davidwilby>
* 2556966 - remove build specs from conda env (2021-05-14 10:01:28 +0100) <davidwilby>
* b50e658 - move env.yml to right place.. (2021-05-14 09:54:59 +0100) <davidwilby>
*   0d2f520 - Merge branch 'main' of github.com:RSE-Sheffield/python-calculator into main (2021-05-14 09:53:44 +0100) <davidwilby>
|\
| * b1179a7 - add package name folder (2021-05-14 11:33:06 +0300) <Anna Krystalli>
* | c883789 - add conda environment yaml (2021-05-14 09:53:06 +0100) <davidwilby>
|/
* fdb8716 - draft commit (2021-05-14 11:23:42 +0300) <Anna Krystalli>
* 328e61b - Add subtraction issue template (2021-05-13 12:23:42 +0300) <Anna Krystalli>
* 31a4a93 - Initial commit (2021-05-13 12:14:08 +0300) <Anna Krystalli>
This is a little more challenging to interpret but reading the output
carefully we have an indicator of where the origin/main
branch is where it reads (origin/main, main). All
subsequent commits are on the currently checked out branch which is
multiply and origin/multiply (i.e. the local
copy of the branch is at the same point as the remote on GitHub).
Knowing this we can see that the multiply branch
diverged from the fa76751 commit on main and
that three commits have been made on the multiply
branch.
Working with Branches
The git switch command is the common method for working
with branches. It allows you to list, create and delete branches along
with a few other tasks.
To list the branches that are available you can just type
git branch or optionally include the --list
option. In the python-maths repository you have cloned you
should see a number of branches listed. The branch you are currently
checked out on is listed first with an asterisk (* )at the
start and they are listed alphabetically. Later we will change the
default order to be more informative.
Creating Branches
You can create a new branch using
git switch -c <new_branch>. By default it will use
the branch you currently have checked out as a basis for the new branch.
If you wish to use a different branch as a basis you can do so by
including its name before the name of the new branch.
Callout
Most of the time when creating branches you should do so from the
main branch. It is therefore important to make sure your
local copy of the main branch is up-to-date. Before
creating a branch you should checkout the main branch and
ensure it is up-to-date.
This means you can omit the explicit statement of which branch you
wish to use as the basis for the new branch, typically
main, when creating it as you will be already be checked
out on that branch when git pull.
To create a new branch called ns-rse/test you can use
the following.
Git will use the current HEAD of the main
branch as a basis for creating the ns-rse/test branch.
Naming Branches
Branch names can not include spaces, you should use underscores or
dashes instead. You can include some special characters too but I would
avoid using # as this is the character used by most shells
to indicate a comment and you would therefore have to always
double quote the branch name at the command line.
A useful convention when creating branches is to include some meta
data about who owns the branch and what it is for and to construct the
branch name from your GitHub/GitLab username followed by a
/ and because you will typically be working on a particular
issue include the issue number followed by a short few words which
describe the work or issue. For example GitHub user ns-rse
working on issue 1 to fix typehints might create a branch called
ns-rse/1-fix-typehints from main.
This structure is informative as it provides other people you collaborate with or who look at the repository an indication of who created the branch, what issue they are working on and a very short indication of what it is concerned about. With this information it is very easy to look up the relevant Issue.
Challenge 3: Assign Issues, Create Branches and Complete the Tasks
In the python-maths repository you have cloned and setup
on GitHub there are issue templates.
In your pairs assign the
01 Add zero division exception and test to one person and
the 02 Add a square root function and test to the other
person.
Work through the tasks adding the necessary code, saving, staging and
committing your changes then pushing to origin (GitHub).
NB only the first issue for zero division should have a
Pull Request created, please do not create a pull request or
merge the Square Root work.
Assign the person who worked on the Square root function to review the Zero Division exception and if everything looks good merge the pull request.
Deleting branches
Branches are typically short lived as they are created to address
small focused pieces of work such as fixing a bug or implementing a new
feature before being merged into the main branch. Over time
you will accrue a number of redundant, out-dated branches and it is
therefore good practice to delete unwanted branches after they have been
merged.
You can not delete a branch you currently have checked out so you
must first checkout an alternative branch. Typically this would be the
main branch after your Pull Request has been merged and the
changes you were working on have been incorporated. You should
git pull the main branch after merging changes
so your locally copy is aware of any recent merges from branches you are
about to delete.
Challenge 4: Delete a branch
Create a throw away branch from main and then delete it
(hint see git branch --help). You can create a branch with
your username and throwaway
(e.g. ns-rse/throwaway) with the following.
Pretending the branch you just created has been merged into the
main branch via a Pull Request delete the now redundant
branch (in this example ns-rse/throwaway).
Callout
You were able to delete the branch you created because you hadn’t
made any changes to it. If you have made changes on a branch and they
have not been merged into main then Git will warn you of
this and refuse to delete the branch. This can be over-ridden with the
--force flag or the shorthand -D which is the
same as --delete --force.
BASH
git switch -c ns-rse/throwaway
touch test_file
git add test_file
git commit -m "Adding test_file"
git switch -
git branch -d ns-rse/throwaway
error: the branch 'ns-rse/throwaway' is not fully merged
hint: If you are sure you want to delete it, run 'git branch -D ns-rse/throwaway'
hint: Disable this message with "git config advice.forceDeleteBranch false"
git -D ns-rse/0-divideBe very careful when forcing deletions, if you have not
pushed your changes to the remote origin then you
will lose them.
Challenge 5 : Automatically delete branches on GitHub
In your pairs navigate to the Settings page and enable the Automatically delete head branches option.
This option is on the General section of Settings page, it indicates that “Deleted branches will still be able to be restored”.
Time Travelling - Losing your HEAD
A branch is a history of commits and you can use git log
to see the commit history (and customise the output so it can be easier
to read), but what if you wanted to look at the state of the branch at a
previous point in time? Well because Git has kept track of everything
you can do that and the command to do so is the same one for switching
branches i.e. git checkout which takes a “reference” as an
argument. So far you have been using branch names as references but
commit hashes are also references and so can be used to checkout the
state of the repository in the past.

main
branch showing the position of HEAD.Here we have a simple linear history and the HEAD of
branch is on commit 8-a80cef8 If you want to checkout
commit 4-8ec389a then you would
git checkout 4-8ec389a and you will see the following
useful and informative warning message.
BASH
git checkout 4-8ec389a
Note: switching to 4-8ec389a'.
You are in 'detached HEAD' state. You can look around, make experimental
changes and commit them, and you can discard any commits you make in this
state without impacting any branches by switching back to a branch.
If you want to create a new branch to retain commits you create, you may
do so (now or later) by using -c with the switch command. Example:
git switch -c <new-branch-name>
Or undo this operation with:
git switch -
Turn off this advice by setting config variable advice.detachedHead to false
HEAD is now at 4-8ec389a complete subtract issue templateHave you lost your head because it is now detached? No,
HEAD is just a special reference that points to a specific
commit (tags are the same) and it is a short hand way of referring to a
commit, what has happened is that Git has moved the commit
HEAD points to from 8-a40cef8 to
4-8ec389a. If you make changes to this branch they will be
lost when you switch back to the 8-a40cef8 commit and you
are told you can do this with git switch -. If you want to
make changes and save them you are advised to create a new branch to do
so.
Challenge 6: Checkout old commits
- Look at the history of the
python-mathsrepository and find out who the author of commit585287awas. - Checkout this commit and look at the contents of the file
tests/test_add.py(you can usecat tests/test_add.py). - Switch back to
HEADhas anything changed in thetests/test_add.pyfile?
BASH
git checkout 585287a
cat tests/test_add.py
import src.python_calculator.add as add
def test_add():
assert add.add(1, 3) == 4
git switch -
cat tests/test_add.py
cat: tests/test_add.py: No such file or directoryThe file tests/test_add.py has an import statement and
defines the test_add() function which checks if the
add.add() function returns the value of 4 when given the
numbers 1 and 3.
The tests/test_add.py file no longer exists on the
HEAD of the main branch!
BASH
git checkout 585287a
git diff main -- tests/test_add.py
diff --git a/tests/test_add.py b/tests/test_add.py
new file mode 100644
index 0000000..bed1ffe
--- /dev/null
+++ b/tests/test_add.py
@@ -0,0 +1,5 @@
+import src.python_calculator.add as add
+
+
+def test_add():
+ assert add.add(1, 3) == 4The file tests/test_add.py has an import statement and
defines the test_add() function which checks if the
add.add() function returns the value of 4 when given the
numbers 1 and 3.
The tests/test_add.py file no longer exists on the
HEAD of the main branch!
Callout
You are not restricted to switch to commits on the same branch you are currently on. You can checkout any commit in the history as long as you know the commit hash.
Comparing References
This is quite a convoluted way of comparing branches though and in this instance the difference is quite simple the file no longer exists, but imagine you wanted to compare a file between branches or commits without having to switch branches and try and hold in your head what the file looked like on one branch whilst you look at the other. That would probably be very challenging.
Fortunately Git can help you here with git diff. This
takes one or two arguments, which are commits or references that you
want to compare. If only one argument is given it compares the currently
checked out commit to the supplied commit/reference.
Thus to compare the HEAD of the divide
branch you would
Ooops! I Did It Again
Nothing to do with Brittney Spears but you are at some stage likely
to commit changes to the wrong branch. This can easily happen when
starting to work on an issue without first creating a new branch to
contain the work and you commit the changes to either the
main branch, which is often protected so you won’t be able
to push your changes or the last branch you were working on.
git reset
One solution to solve this with Git is to git reset the
branch to which you have just mistakenly made the commit. This removes
reference to the changes from the Git history but leaves the changes to
the files in place and they appear as unstaged files. It is
ideal if you have only one commit you wish to undo.
Relative Refs
Normally you are working on the HEAD of a branch which
is the most recent commit that has been made along with any staged, but
uncommitted changes. Git has a simple way of referring to previous
commits relative to HEAD using the ~ and
counting backwards.

If you want to undo the last commit then you can do this
using git reset --soft HEAD~1.
Callout
There are three options to git reset that influence how
the changes in commits are handled these are --soft,
--mixed (the default) and --hard.
For a detailed exposition of git reset see the excellent
Atlassian
| Git reset article.
Challenge 7: Commits on the wrong branch
- Switch to the
mainbranch of thepytest-mathsrepository. - Create a new file using
echo "# How to Contribute to this repo" > CONTRIBUTING.md - Stage and commit the file to the
mainbranch of your repository. NB to do this you will have to disable thepre-commitchecks with the-nflag.
Ooops you’ve just committed to the main branch which is
protected so you can’t push your changes. Now move the commit to a new
branch so you can push them.
- Reset the change.
- Create a new branch called
<github_user>/contributing. - Stage and commit the file to
<github_user>/contributing.
You can git reset --mixed to HEAD~1,
i.e. the previous commit, which removes the CONTRIBUTING.md
file from the commit history, leaving it unstaged, then create a new
branch and add it to that.
BASH
git switch main
echo "# How to Contribute to this repo" > CONTRIBUTING.md
git add CONTRIBUTING.md
git commit -n -m "docs: Adding contributing guideline template"
git reset --mixed HEAD~1
git switch -c ns-rse/contributing
git add CONTRIBUTING.md
git commit -m "docs: Adding contributing guideline template"Alternatively you can checkout the previous commit before
you added the file by mistake, create the
<github_user>/contributing branch, and
git cherrypick the commit from main which
contains the CONTRIBUTING.md file and then remove
the commit from main.
BASH
git switch main
echo "# How to Contribute to this repo" > CONTRIBUTING.md
git add CONTRIBUTING.md
git commit -n -m "docs: Adding contributing guideline template"
git log # Note the commit of the mistaken hash
git revert HEAD~1 # Checkout the previous commit on the main branch
git switch -c ns-rse/contributing
git cherrypick <hash>
git switch main
git reset --hard HEAD~1A third similar option is checkout the previous commit
before you added the file by mistake, create the
<github_user>/contributing branch, and copy the
CONTRIBUTING.md file from the HEAD of
main using git restore and then
remove the commit from main.
BASH
# TODO get commit hash of last commit
git checkout HEAD~1
git switch -c ns-rse/contributing
git restore -s main -- CONTRIBUTING.md # Copy the file from HEAD of main branch or
git add CONTRIBUTING.md
git commit -m "Adding contributing guideline template"
git switch - # Switch back to main
git
# TODO : Complete solution and add output once sample repository is in placeNB You could also copy the file using the older
git checkout main -- CONTRIBUTING.md.
You then have to decide how to add the changes to a branch. If they are brand new then you can create a new branch and add them. If however they were meant to be added to an existing branch you face a slight problem as if you try to switch branches you will be told that this would over-write the changes to the files you have just modified and unstaged and you don’t want to lose your work.
The solution here is to use git stash to temporarily
store the unstaged changes, switch branches to the target branch they
should be on, and you can then un-stash them (known as
poping) onto the correct branch.
git revert
git reset is destructive, you can lose work using it and
it is advisable not to use it when you have more than one
commit you wish to undo as you lose the intermediary work between
commits as you are restored to the commit you reset to. Fortunately Git
has the revert option is a non-destructive approach to
undoing changes in your Git history. Instead it takes a specified commit
and inverts the changes, i.e. goes back to the previous state and rather
than discarding the changes it makes a new “revert” commit to record the
inversion and this new “revert” commit becomes the HEAD of
the branch. git revert has to have a reference in
order to work, whether that is absolute (i.e. a hash) or relative.
Callout
The differences between reset and revert is
that one (reset) is destructive and loses changes the other
(revert) undoes the changes and makes a new commit
recording these changes.
Be very careful when forcing deletions, if you have not
pushed your changes to the remote origin then you will lose
them.
Switching Branches during Work in Progress
Sometimes you will be doing some work and a colleague will ask you to review a pull request or help them with a problem they have on their branch. When performing pull request reviews it can be quite common to run tests to check everything passes if you don’t have Continuous Integration doing this automatically for you (we will come to that in another episode).
But there is a challenge, in order to switch branches you have to stage and commit all changes to tracked files.
BASH
git switch branch2
echo "Please feel free to contribute to this repository" >> CONTRIBUTING.md
git add CONTRIBUTING.md
git commit -m "Adding CONTRIBUTING.md"
echo "\nPlease don't break my repository though!" >> CONTRIBUTING.md
git switch main
error: Your local changes to the following files would be overwritten by checkout:
CONTRIBUTING.md
Please commit your changes or stash them before you switch branches.
AbortingWhilst you could commit your changes and subsequently
git commit --amend (more on this in the next episode) there
is another option.
git stash
git stash allows you to save your current changes in a
temporary location and then reverts to the last commit
(HEAD) and allows you to move about to other branches and
undertake work. There are lots of options to git stash but
the basics are pretty straight-forward. You start by
git stash push (the push is actually optional)
and you can include a --message that explains what the
stash contains, you are told if this has worked and on what branch the
stash was made and can then switch branches, pull down changes, create a
new branch and do something different.
3. Return to branch2
When you have finished this other work you can return to
branch2 and pop the stash back. To see what
stashes there are you can use git stash list
4. pop the last stash
When you are ready to restore the work you can do so using
git stash pop which by default will restore the
last stash.
BASH
git stash pop
On branch branch2
Changes not staged for commit:
(use "git add <file>..." to update what will be committed)
(use "git restore <file>..." to discard changes in working directory)
modified: CONTRIBUTING.md
no changes added to commit (use "git add" and/or "git commit -a")
Dropped refs/stash@{0} (13c8c6fb23f9fcdd884b4528356db37527c9b3e4)The changes to CONTRIBUTING.md and the corresponding
entry are removed from the stash list.
Multiple Stashes
Over time though you may collect multiple stashes.
1. Make two stashes
We stash CONTRIBUTING.md, the last message is reused by
default, then we add ANOTHER.md and stash it with a
different message.
2. Pop the CONTRIBUTING.md stash
There are now two stashes each with different names.
You may not want to restore the work stashed with the commit message
Stashing ANOTHER.md file but rather restore the earlier
Adding CONTRIBUTING.md work first. You can do this by
referring to the number associated with the stash that is within the
curly braces. For the Adding CONTRIBUTING.md this is
1.
BASH
git stash pop 1
On branch branch2
Changes not staged for commit:
(use "git add <file>..." to update what will be committed)
(use "git restore <file>..." to discard changes in working directory)
modified: CONTRIBUTING.md
no changes added to commit (use "git add" and/or "git commit -a")
Dropped refs/stash@{1} (dd538beb8f14590f720e9b9f677ba7381240bd92)Only the CONTRIBUTING.md file has been restored and not
the ANOTHER.md.
Challenge 7: Stashing
Working in your pairs on the python-maths
repository…
- Create a
contributingbranch. - Create a
CONTRIBUTING.mdwithecho "# Contributing\n\nContributions to this repository are welcome via Pull Requests." > CONTRIBUTING.md. - Do not add and commit, instead
git stashyour changes. - Switch to the
mainbranch and create acitationbranch. - Add a basic
CITATION.cffwithecho "cff-version: 1.2.0\ntitle: Pytest Examples\ntype: software" > CITATION.cff. - Add and commit this file.
- Unstash the
CONTRIBUTING.mdfile on thecitationbranch. - Amend the previous commit to include
CONTRIBUTING.md(Hint - you need toaddandcommitthe file). - Push the changes to GitHub, create a merge request and merge the changes.
- Delete the branches locally (try and avoid any messages telling you there are unmerged changes).
Lets create the contributing branch
BASH
git switch -c contributing
echo "# Contributing\n\nContributions to this repository are welcome via Pull Requests." > CONTRIBUTING.mdIf we want to switch branches without making a commit but save our
work in progress we stash the work and switch to main and
create a new branch (citation) for and add a
CITATION.cff file.
BASH
git stash -m "An example stash"
git switch main
git switch -c citation
echo "cff-version: 1.2.0\ntitle: Pytest Examples\ntype: software" > CITATION.cff
git add CITATION.cff
git commit -m "chore: Adding a CITATION.cff"We now unstash the contributing work to this branch and commit the changes, amending the commit and push to GitHub
BASH
git pop
git add CONTRIBUTING.md
git commit -m --amend "chore: Adding a CITATION.cff and CONTRIBUTING.md"
git pushYou should then create a Pull Request and merge it. To ensure don’t
get any messages about unmerged changes when deleting the branches you
should pull the changes that have been merged to main.
Popping around and applying
- You can
git stash applytopopa stash but leave it in the stash list.
There are a lot of useful things git stash can be used
for. Refer to the help pages (git stash --help) for more
information as well as the Further Resources.
References - a revelation
Whilst we have focused on consolidating our understanding of branches in this introductory episode there have been hints as to the true nature of branches in Git, have you worked out what this is yet?
Internally Git does not have branches at all! Branches are merely a reference to a series of commits and each commit in a “branch” references the commit prior to it. In fact everything in Git that allows us to look at the different states of the repository and move between them is a reference, whether that is a named branch, or a tag which is a relative reference. They all point to a commit.
This was a revelation that came to me as I wrote the material for this Episode and thought it worth sharing.
Key Points
- Branches and how they relate to each other are fundamental to collaborating using Git.
- The history of a branch is a series of commits and extends all the way back to the very first commit and not the point at which it forked from its parents.
- Branches can be easily created, merged and deleted.
- Commits all have references and Git can move you between these
references using
git commitor compare them usinggit diff.
Links
Content from Diverging Branches
Last updated on 2024-09-24 | Edit this page
Overview
Questions
- What are branches?
- How do we use branches in git effectively?
- How can I check out other peoples branches whilst working on my own?
- How do I keep my development branch up-to-date with
main?
Objectives
- How branches can be used to fix bugs or develop features in isolation.
- Switching branches, stashing and restoring.
- How to keep a development branch up-to-date.
- Differences between and when to use merge and rebase.
- Git worktrees instead of branches.
- Tracking multiple origins
Diverging Branches
As you and your collaborator(s) work on your repository you may find
that changes others have made get merged into the main
before you have finished your work. This has in fact just happened, the
work to add a Zero Division exception has been merged via a Pull
Request, but the work to address the Square Root function hasn’t and is
in effect behind the main branch. The following is a
representation of the current state, albeit from a single developer.
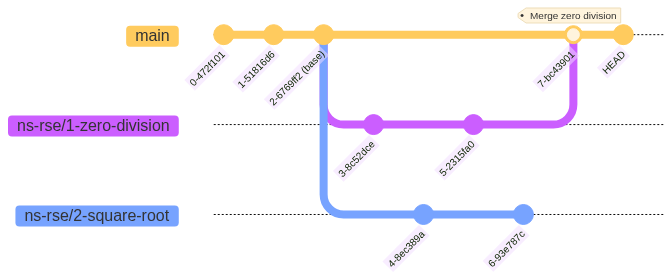
python-maths
ns-rse/2-square-root is now behind the main
branch which has incorporated the changes from
ns-rse/1-zero-division.
In this example the main branch now includes the commits
3-8c52dce and 5-2315fa0 from the
ns-rse/1-zero-division branch as well as the commit
7-bc43901 which was made when the
ns-rse/1-zero-division branch was merged in. The
ns-rse/2-square-root branch does not contain these
commits.
In this particular example that is not necessarily a problem, the two
features/issues are completely independent and it would be possible to
merge the ns-rse/2-square-root branch into
main without any merge conflicts because neither have
modified the same files in the same location.
That will not always the case though, sometimes merge conflicts might
arise if the second branch is changing some of the same files as the
first branch. Another scenario might be that whilst work was being done
on adding a new feature branch a critical bug was fixed that the new
feature depends on and the changes now in main need
incorporating in the feature branch.
There are two approaches to solving this merging
(git merge) and rebasing (git rebase).
Merging
python-maths ns-rse/2-square-root is now
behind the main branch which has incorporated the changes
from ns-rse/1-zero-division.
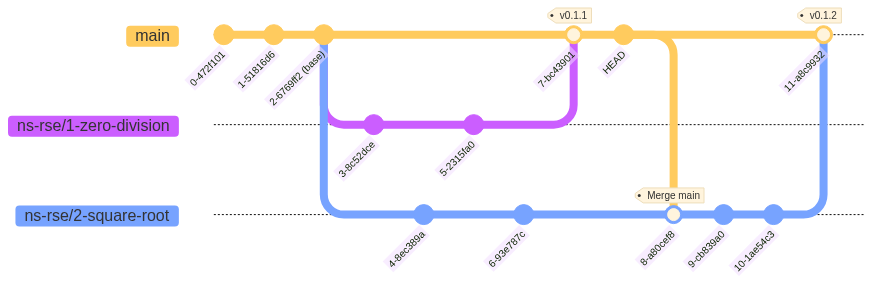
ns-rse/1-zero-division into main then
main into ns-rse/2-square-root. Development is
completed on ns-rse/2-square-root and the feature merged
into main
The syntax of git merge is
Where <ref> is one of a commit, branch name or tag
(both of which are references to commits). There is an option for how
the merge is made known as fast-forward. Fast-forward is
the default action unless annotated tags are being merged that is in the
incorrect hierarchy. To explicitly enabled this behaviour
(--ff) and the branch pointer, that is where the current
branch diverged from the the main branch) is updated to
point to the most recent commit on the main branch.
Typically though the main branch contains work from
someone else’s branch and we want to incorporate those changes in the
another branch.
3. Switch back to main
Check the contents of README.md (there is no such file
as the it exists on branch1).
5. Merge branch1 into main
Switch back to main and merge branch1 (this
is equivalent to merging a Pull Request). The file
README.md now exists on the main branch.
6. Merge main, which now contains
README.md, into branch2
Switch to branch2 which has now diverged as it contains
changes of its own and main contains the changes
made on branch1. We want to merge the changes on
main and “fast-forward” if possible.
BASH
git switch branch2
git merge --ff main # Merge changes merged into main from branch1 into branch2
git logp
* d914fee - (HEAD -> branch2) Merge branch 'main' into branch2 (2024-03-01 12:02:08 +0000) <Neil
|\
| * 7817070 - (main, branch1) Adding a README.md (2024-03-01 11:57:35 +0000) <Neil Shephard>
* | a14a643 - Adding a LICENSE (2024-03-01 12:00:39 +0000) <Neil Shephard>
|/
* 1bd6bb8 - Initial commit (2024-03-01 11:57:06 +0000) <Neil Shephard>7. Merge branch2 into main
We now have the changes from branch1 included in
branch2 by virtue of having merged main. If we
switch back to main we can merge the changes from
branch2.
BASH
git switch main
git merge branch2
git logp
* d914fee - (HEAD -> main, branch2) Merge branch 'main' into branch2 (2024-03-01 12:02:08 +0000) <Neil Shephard>
|\
| * 7817070 - (branch1) Adding a README.md (2024-03-01 11:57:35 +0000) <Neil Shephard>
* | a14a643 - Adding a LICENSE (2024-03-01 12:00:39 +0000) <Neil Shephard>
|/
* 1bd6bb8 - Initial commit (2024-03-01 11:57:06 +0000) <Neil Shephard>8. Delete branch1 and branch2
As we’re done with branch1 and branch2 we
can delete them.
BASH
# Delete the two branches
git branch -d branch{1,2}
git logp
* d914fee - (HEAD -> main) Merge branch 'main' into branch2 (2024-03-01 12:02:08 +0000) <Neil Shephard>
|\
| * 7817070 - Adding a README.md (2024-03-01 11:57:35 +0000) <Neil Shephard>
* | a14a643 - Adding a LICENSE (2024-03-01 12:00:39 +0000) <Neil Shephard>
|/
* 1bd6bb8 - Initial commit (2024-03-01 11:57:06 +0000) <Neil Shephard>Having used git merge we couldn’t perform a simple
fast-forward because the history of main now contained
changes that were made on branch1 and so a separate commit
(d914fee) was made to merge the main branch
into main (commits are denoted by * and so you
can see the commits were made on separate branches). We can see from the
graph that README.md was added from a separate
branch1 and LICENSE was added from
branch2, although after deleting the branches they are no
longer shown by name in the git log --graph output.
Rebasing
Rebasing moves the point at which the branch diverged from its
original position to another, in this case the HEAD of the
main branch. You are changing the base commit,
hence the name git rebase.
python-maths ns-rse/2-square-root is now
behind the main branch which has incorporated the changes
from ns-rse/1-zero-division.

main which includes
ns-rse/1-zero-division. Two more commits are made and
ns-rse/2-square-root is then merged into
main.git rebase takes a different approach to bringing
branches up-to-date and in effects moves the point at which a branch
diverged from main rather than merging the changes in.
5. Merge branch1 into main (equivalent to
making a Pull Request)
Switch back to main and merge branch1 (this
is equivalent to merging a Pull Request). The file
README.md now exists on the main branch.
6. Rebase branch2 onto main so it includes
the README.md and the point of divergence is updated
Switch to branch2 which has now diverged as it contains
changes of its own and main contains the changes
made on branch1. We want to rebase branch2
onto main so that it appears as if branch2
forked after the changes from branch1 were
merged.
BASH
git switch branch2
git rebase main # Rebase branch2 onto main
git logp
* 12f5202 - (HEAD -> branch2) Adding a LICENSE (2024-03-01 12:19:12 +0000) <Neil Shephard>
* 4e8e933 - (main, branch1) Adding README.md (2024-03-01 12:18:37 +0000) <Neil Shephard>
* 2459609 - Initial commit (2024-03-01 12:18:37 +0000) <Neil Shephard>7. Merge branch2 into main
We now have the changes from branch1 included in
branch2 by virtue of having rebased onto main
after the changes in branch1 were merged in. If we
switch back to main we can merge the changes from
branch2.
BASH
git switch main
git merge branch2
git logp
* 12f5202 - (HEAD -> main, branch2) docs: Adding a LICENSE (2024-03-01 12:19:12 +0000) <Neil Shephard>
* 4e8e933 - (branch1) docs: Adding README.md (2024-03-01 12:18:37 +0000) <Neil Shephard>
* 2459609 - Initial commit (2024-03-01 12:18:37 +0000) <Neil Shephard>8. Delete branch1 and branch2
As we’re done with branch1 and branch2 we
can delete them.
BASH
git branch -d branch{1,2}
git logp
* 12f5202 - (HEAD -> main) Adding a LICENSE (2024-03-01 12:19:12 +0000) <Neil Shephard>
* 4e8e933 - Adding README.md (2024-03-01 12:18:37 +0000) <Neil Shephard>
* 2459609 - Initial commit (2024-03-01 12:18:37 +0000) <Neil Shephard>As you can see the history of the main branch is now
linear.
Challenge 1: Diverging Branches
In your pairs bring the square-root branch up-to-date
and incorporate the changes that have been merged into main
from the zero-division branch and then create a Pull
Request to merge the updated square-root changes into
main on GitHub, review it and merge it.
The person who has been working on the square-root
issue/branch will be at the helm for this, but work together to come up
with a solution. You can use either of the two strategies
git merge or git rebase to do this.
The first thing to do is make sure main is up-to-date
and has the changes that have been merged from the
zero-division branch locally.
Then you can switch branches to the square-root branch
and merge the main branch in.
You can now push the changes that are on the square-root
branch to GitHub and make a Pull Request for approval
The first thing to do is make sure main is up-to-date
and has the changes that have been merged from the
zero-division branch locally.
Then you can switch branches to the square-root branch
and merge and rebase onto main.
You can now push the changes that are on the square-root
branch to GitHub and make a Pull Request for approval
Oh no I’ve got a merge conflict
Both the git merge and git rebase
strategies in the worked examples and the python-maths
repositories you worked through in the challenge were fairly painless
because none of the changes that were made touched the same files. In
real-life things are often likely to be a bit more messy and when you
want to update your diverged branch you will often find that files you
have been working on have been modified and merged into
main by others. This results in a “merge conflict” where
Git can not determine which lines are required and therefore requires
manual intervention.
If you have undertaken the Git & GitHub Through GitKraken - From Zero to Hero! course you will have encountered merge conflicts when working through the “Python Calculator” exercise and have some idea of how to resolve them. We will however now go through resolving the issue when updating diverged branches.
2. Create branch1 and add a README.md
Again we add a README.md but this time we make two
commits to it, adding an extra line.
4. Create branch2 and add a README.md
We now set ourselves up for a conflict by creating a
README.md on branch2, knowing full well that
such a file already exists on branch1. We put different
text into it.
5. Merge branch1 into main
Merge branch1 into main. The
README.md has the text from branch1. As we are
done with this branch we can delete it now.
6. Switch to branch2 and add another line to
README.md
Switch back to branch2 and add another line to
README.md, stage and commit it. The history now shows that
we have two commits on this branch after the “Initial commit”.
BASH
# Switch to branch2 add more to `README.md` and rebase
git switch branch2
echo "Lets add another commit to make things messier" >> README.md
git add README.md
git commit -m "Bulking out README.md with more information"
git logp
* bce21bd - (HEAD -> branch2) Bulking out README.md with more information (2024-03-01 13:26:01 +0000) <Neil Shephard>
* 29b2e32 - This repo needs a README.md (2024-03-01 13:23:16 +0000) <Neil Shephard>
* 57e68aa - Initial commit (2024-03-01 13:20:14 +0000) <Neil Shephard>6. Rebase branch2 onto main
We now want to update branch2 by rebasing onto
main so that we have the new changes from main
(i.e. those merged from branch1). In this instance though
we know both branch1 and branch2 have
modified the file README.md and so we expect to get a
conflict and sure enough we do.
BASH
git rebase main
Auto-merging README.md
CONFLICT (add/add): Merge conflict in README.md
error: could not apply fcfe2db... This repo needs a README.md
hint: Resolve all conflicts manually, mark them as resolved with
hint: "git add/rm <conflicted_files>", then run "git rebase --continue".
hint: You can instead skip this commit: run "git rebase --skip".
hint: To abort and get back to the state before "git rebase", run "git rebase --abort".
Recorded preimage for 'README.md'
Could not apply fcfe2db... This repo needs a README.mdOh dear we have, as expected, encountered the dreaded “merge
conflict” as both branch1 and branch2 made
changes to README.md. Lets take a look at what the file now
looks like.
BASH
cat README.md
<<<<<<< HEAD
# Just a test
Lets add another line in a separate commit
=======
# Just a test
But we're creating a merge conlict
>>>>>>> 29b2e32 (This repo needs a README.md)Here HEAD refers to the branch that is being merged in
(main) which contains the changes we made on
branch1 and merged into main. The text that
this refers to is delimited by <<<<<<<
and ======= and is # Just a test and
Lets add another line in a separate commit. The commit
(fcfe2db) on branch2 which added two
lines (although technically its 4 since we also included blank lines)
then follows and is delimited by ======= and
>>>>>>> and includes the message.
We are given some useful information as to what we could do and there are three options.
Resolve all conflicts manually, mark them as resolved with "git add/rm <conflicted files>", then run "git rebase --continue".You can instead skip this commit: run "git rebase --skip".To abort and get back to the state before "git rebase", run "git rebase --abort".
These are really useful messages telling us how we can proceed. In
this instance we want to take option 1, so we should open the
README.md and edit it to leave it in the state we want the
file to be in.
7. Resolve the conflict
You can use the nano editor to open the file with
nano README.md. Edit it to look like this
You can use Ctrl+k to remove a whole line at once. Save
the file and return to the command prompt (in nano this is
Ctrl+O then Ctrl+X).
Callout
nano is a
simple text editor found on most GNU/Linux and OSX systems that is quick
and easy to use. A useful bookmark to help whilst developing the muscle
memory for the commands is the nano
shortcuts cheatsheet.
It is possible that your system may use a different editor than
nano by default, e.g. vim. It does not matter
which text editor you use to edit and save the files and if you are
comfortable using this then that is not a problem.
8. Add the conflicted file and continue with rebase
You can now continue with the advice and add the conflicted files back to Git and continue with the rebase.
BASH
git add README.md
git rebase --continue
Recorded resolution for 'README.md'.
[detached HEAD d041adb] This repo needs a README.md
1 file changed, 4 insertions(+)
Auto-merging README.md
CONFLICT (content): Merge conflict in README.md
error: could not apply 84a1592... Bulking out README.md with more information
hint: Resolve all conflicts manually, mark them as resolved with
hint: "git add/rm <conflicted_files>", then run "git rebase --continue".
hint: You can instead skip this commit: run "git rebase --skip".
hint: To abort and get back to the state before "git rebase", run "git rebase --abort".
error: could not parse conflict hunks in 'README.md'
Could not apply 84a1592... Bulking out README.md with more informationHang on, we just resolved the merge conflict why are we being told
there is another? Well the first conflict with commit
fcfe2db was resolved and we are told as much in the line
Recorded resolution for 'README.md', however there is now a
conflict between that and commit 84a1592. We get the same
advice so lets take a look at the state of README.md
BASH
# Just a test
Lets add another line in a separate commit
But we're creating a merge conflict
<<<<<<< HEAD
>>>>>>> fcfe2db (This repo needs a README.md)
=======
Lets add another commit to make things messier
>>>>>>> 84a1592 (Bulking out README.md with more information)Here we can see its the second line that we added to
README.md under branch2 that read
Lets add another commit to make things messier that is
causing the problem. Its not in the main branch on which we
are rebasing so Git doesn’t know whether it should be and we have to
manually resolve this. Edit the file so that it looks like the
following.
9. Add the conflicted file and continue with the second stage of the rebase
Then add the conflicted file and continue with the rebase.
BASH
git add README.md
git rebase --continue
[detached HEAD 0ccfe91] Bulking out README.md with more information
1 file changed, 1 insertion(+), 1 deletion(-)
Successfully rebased and updated refs/heads/branch2.We are told that the rebase has been successful and
branch2 now contains all commits from main
(which includes those merged from branch1). If we look at
the contents of README.md it contains all of the lines we
added to both branches as that is how we chose to resolve the conflicts
manually.
BASH
cat README.md
# Just a test
Lets add another line in a separate commit
But we're creating a merge conflict
Lets add another commit to make things messierThe history/graph is linear now and shows that branch2
is two commits ahead of main.
BASH
git logp
* 0ccfe91 - (HEAD -> branch2) Bulking out README.md with more information (2024-03-01 14:00:57 +0000) <Neil Shephard>
* d041adb - This repo needs a README.md (2024-03-01 13:59:31 +0000) <Neil Shephard>
* 64905e8 - (main) Ooops, missed a line from the README.md (2024-03-01 13:56:35 +0000) <Neil Shephard>
* e68485d - Adding README.md (2024-03-01 13:55:50 +0000) <Neil Shephard>
* dec5385 - Initial commit (2024-03-01 13:55:50 +0000) <Neil Shephard>Callout
You may be wondering why when performing git rebase it
mentions git merge. This is because a rebase will
sequentially merge all commits from the branch you are rebasing onto, in
this case main, into the HEAD of your current
checked out branch (branch2).
Repeating yourself
You had to resolve two merge conflicts here, if the history you are merging has a lot of commits you may end up solving the same merge conflict repeatedly. There is a way to avoid this though.
Callout
Bringing a diverged branch up-to-date can get very messy and confusing if there is a large amount of divergence. The best strategy to avoid this complication is two fold.
- Break work down into small chunks and regularly merge them into
main. - If this can not be avoided or lots of others are making changes you
should
git mergeorgit rebaseyour feature branch ontomainfrequently.
You may encounter this situation and find that you are repeatedly
resolving the same conflict as you want the finer grained control over
git rebase and one option is to
git rebase --abort and use git merge instead
as you only have to resolve the conflicts once, although there may be a
lot of them. One disadvantage of this is it makes it look like the
commits stem from you and so many people prefer the rebase strategy.
Help is at hand though if you find you are repeatedly being asked to resolve the same conflict as you progress through a rebase in the form of rerere which stands for “reuse recorded resolution” and causes Git to remember how it has resolved merge conflicts at a given point and the next time it is encountered it will use the solution from the first instance.
You can enable this in your global configuration, which is covered in greater detail in the next episode, with the following.
If you only wish to use this strategy on some repositories you can apply it to your local configuration from within the working directory.
You can of course enable globally and disable locally as local configuration variables take precedence over global.
Challenge 2: Merge Conflicts
You have now merged both the Zero Division and Square Root features
into your main branch. In order to gain experience of
resolving merge conflicts the branch
origin/ns-rse/merge-conflict exists with some of these
changes already in place.
In your pairs work through the tasks of resolving these conflicts.
- Create a new branch
resolve-merge-conflict. - Merge the
origin/ns-rse/merge-conflictbranch intoresolve-merge-conflict. - Look at the file you are told there are conflicts with and resolve
them, you should remove the conflict delimiters
(
<<<<<<< HEAD/=======/>>>>>>> origin/ns-rse/merge-conflict) and select just one of the changes to retain.
The first thing to do is make sure main is up-to-date
and has the changes that have been merged from the
zero-division branch locally.
BASH
cd ~/work/git/hub/ns-rse/python-maths
git switch main
git pull
git switch -c resolve-merge-conflict
git merge origin/ns-rse/merge-conflictYou should, hopefully, see some merge conflicts being reported.
BASH
Auto-merging tests/test_arithmetic.py
CONFLICT (content): Merge conflict in tests/test_arithmetic.py
Recorded preimage for 'tests/test_arithmetic.py'
Automatic merge failed; fix conflicts and then commit the result.
…and if we look at the tests/test_arithmetic.py it shows
the following conflicts.
PYTHON
<<<<<<< HEAD


def test_divide_zero_division_exception() -> None:
    """Test that a ZeroDivisionError is raised by the divide() function."""
    with pytest.raises(ZeroDivisionError):
        arithmetic.divide(2, 0)
||||||| cdd8fcc
=======


def test_divide_zero_division_exception() -> None:
    """Test that a ZeroDivisionError is raised by the divide() function."""
    with pytest.raises(ZeroDivisionError):
        arithmetic.divide(10, 0)
>>>>>>> origin/ns-rse/merge-conflict
The ns-rse/merge-conflict uses
arithmetic.divide(10, 0) whilst the function added in the
earlier task uses arithmetic.divide(2, 0). Select one to
use (it doesn’t matter which) and tidy up so it looks like the
following.
Merge or Rebase
Arguments rage online between experienced users as to whether you
should git merge or git rebase it can often be
a matter of preference and you should agree within your team which
strategy to use and stick with it.
However it is worth noting that if you git merge your
changes from the main branch into your feature branch when
you come to merge your feature branch into main via a Pull
Request then the git diff will show all changes for commits
that have been merged into main since your feature branch
was made and not just the changes you have made in your feature branch
(i.e. the commits that have already been merged into main
also appear in your pull request). This can make reviewing pull requests
considerably harder and is a good case for using git rebase
to keep your feature branches up-to-date when you know they have
diverged.
Key Points
- Branches can become outdated as work progresses
- Branches can be brought up-to-date with either
git mergeorgit rebase.
Links
Content from Hooks
Last updated on 2024-08-02 | Edit this page
Overview
Questions
- What the hell are hooks?
- How can hooks improve my development workflow?
- What is
pre-commitand how does it relate to thepre-commithook? - What
pre-commithooks are available?
Objectives
- Understand what Git hooks are.
- Know what the different types of hooks are and where they are stored.
- Understand how
pre-commitframework is configured and runs. - Add new hooks and repos to
pre-commit. - How to keep
pre-committidy.
What are hooks?
Hooks are actions, typically one or more scripts, that are run in
response to a particular event. Git has a number of stages at which
hooks can be run and events such as commit,
push, pull all have hooks that can run
pre (before) or post (after) the action and
these are really useful for helping automate your workflow as
they can capture problems with linting and tests much earlier in the
development cycle than for example Continuous Integration failing after
pull requests have been made.
In a Git repository hooks live in the .git/hooks
directory and are short Bash scripts that are
executed at the relevant stage. We can list the contents of this
directory with ls -lha .git/hooks and you will see there
are a number of executable files with names that indicate at what stage
they are run but all have the .sample extension which means
they are not executed in response to any of the actions.
OUTPUT
❱ mkdir test
❱ cd test
❱ git init
❱ ls -lha .git/hooks
drwxr-xr-x neil neil 4.0 KB Fri Feb 23 10:40:42 2024 .
drwxr-xr-x neil neil 4.0 KB Fri Feb 23 10:40:46 2024 ..
.rwxr-xr-x neil neil 478 B  Fri Feb 23 10:40:42 2024 applypatch-msg.sample
.rwxr-xr-x neil neil 896 B  Fri Feb 23 10:40:42 2024 commit-msg.sample
.rwxr-xr-x neil neil 4.6 KB Fri Feb 23 10:40:42 2024 fsmonitor-watchman.sample
.rwxr-xr-x neil neil 189 B  Fri Feb 23 10:40:42 2024 post-update.sample
.rwxr-xr-x neil neil 424 B  Fri Feb 23 10:40:42 2024 pre-applypatch.sample
.rwxr-xr-x neil neil 1.6 KB Fri Feb 23 10:40:42 2024 pre-commit.sample
.rwxr-xr-x neil neil 416 B  Fri Feb 23 10:40:42 2024 pre-merge-commit.sample
.rwxr-xr-x neil neil 1.3 KB Fri Feb 23 10:40:42 2024 pre-push.sample
.rwxr-xr-x neil neil 4.8 KB Fri Feb 23 10:40:42 2024 pre-rebase.sample
.rwxr-xr-x neil neil 544 B  Fri Feb 23 10:40:42 2024 pre-receive.sample
.rwxr-xr-x neil neil 1.5 KB Fri Feb 23 10:40:42 2024 prepare-commit-msg.sample
.rwxr-xr-x neil neil 2.7 KB Fri Feb 23 10:40:42 2024 push-to-checkout.sample
.rwxr-xr-x neil neil 2.3 KB Fri Feb 23 10:40:42 2024 sendemail-validate.sample
.rwxr-xr-x neil neil 3.6 KB Fri Feb 23 10:40:42 2024 update.sample
If you create a repository on GitHub, GitLab or another forge when you clone it
locally these samples are created on your system. They are not
part of the repository itself as files under the .git
directory are not part of the repository.
Challenge 1: Checking out and enable sample hooks
Lets take a look at the hooks in the python-maths
repository you have cloned for this course.
- What does
.git/hooks/pre-push.sampledo? - Enable the
.git/hooks/pre-pushusing the.git/hooks/pre-push.sample. - Test the enabled hook by making an empty commit that will trigger the hook (hint it is case-sensitive).
Git will have populated the .git/hooks directory
automatically when you cloned the python-maths.
- Change directory to the cloned
python-mathsdirectory. - Look at the file
.git/hooks/pre-push.sample.
BASH
❱ cd python-maths
❱ cat .git/hooks/pre-push.sample
#!/bin/sh

# An example hook script to verify what is about to be pushed.  Called by "git
# push" after it has checked the remote status, but before anything has been
# pushed.  If this script exits with a non-zero status nothing will be pushed.
#
# This hook is called with the following parameters:
#
# $1 -- Name of the remote to which the push is being done
# $2 -- URL to which the push is being done
#
# If pushing without using a named remote those arguments will be equal.
#
# Information about the commits which are being pushed is supplied as lines to
# the standard input in the form:
#
#   <local ref> <local oid> <remote ref> <remote oid>
#
# This sample shows how to prevent push of commits where the log message starts
# with "WIP" (work in progress).

remote="$1"
url="$2"

zero=$(git hash-object --stdin </dev/null | tr '[0-9a-f]' '0')

while read local_ref local_oid remote_ref remote_oid
do
    if test "$local_oid" = "$zero"
    then
        # Handle delete
        :
    else
        if test "$remote_oid" = "$zero"
        then
            # New branch, examine all commits
            range="$local_oid"
        else
            # Update to existing branch, examine new commits
            range="$remote_oid..$local_oid"
        fi

        # Check for WIP commit
        commit=$(git rev-list -n 1 --grep '^WIP' "$range")
        if test -n "$commit"
        then
            echo >&2 "Found WIP commit in $local_ref, not pushing"
            exit 1
        fi
    fi
done

exit 0
When enabled this hook will “prevent push of commits where the log message starts with ”WIP” (work in progress)”
This sounds like a good idea as it, notionally, prevents people from pushing work that is in progress, if they are in the habit of starting commit messages with “WIP”.
- Enable the hook.
- Create a new branch
<github-user>/test-hookto test the hook on. - Make an empty commit with a message that starts with
WIPe.g.git commit --allow-empty "WIP - testing the pre-push commit". Was the commit pushed? - Delete the branch you created.
We can test the hook by making a throw-away branch and adding an
empty commit that starts with WIP and then trying to
git push the commit. After it fails we can force delete
this test branch.
Callout
You may have encountered the non-fast-forward
error when attempting to push your changes to a remote. As the
message shows this is because there are changes to the remote branch
that are not in the local branch and you are advised to
git pull before attempting to git push
again.
BASH
❱ git push origin main
> To https://github.com/USERNAME/REPOSITORY.git
>  ! [rejected]        main -> main (non-fast-forward)
> error: failed to push some refs to 'https://github.com/USERNAME/REPOSITORY.git'
> To prevent you from losing history, non-fast-forward updates were rejected
> Merge the remote changes (e.g. 'git pull') before pushing again.  See the
> 'Note about fast-forwards' section of 'git push --help' for details.
A simple addition you can add to the .git/hooks/pre-push
script is to have it git fetch before attempting to make a
git push which retrieve details, but not pull them, of
changes that have been made to the branch on origin.
Pre-Commit
Pre-commit hooks that run before commits are made are really useful to the extent that they require special discussion and will be the focus of the remainder of this episode. Why are they so useful? It’s because they shorten the feedback loop of changes that need to be made when checking and linting code. It may seem mundane and unnecessary to apply such standards to your code, particularly if it is just exploratory code development, but over time if you employ these tools the way in which you write code will change so that it becomes natural to write code that is formatted and linted and should you then decide that code is ready to be used beyond exploratory stage it will not need refactoring in order to get it in shape. In essence this encourages adoption of good coding practices from the outset, taking responsibility/ownership of the code you write so that it is to the highest standards it can be. In the long run t is better to form good habits than bad ones and hooks help you do so.
There is a framework for pre-commit hooks called,
unsurprisingly, pre-commit that
makes it incredibly easy to add (and configure) some really useful
pre-commit hooks to your workflow.
Callout
From here on whenever pre-commit is mentioned it refers
to the Python package pre-commit
and not the hook that resides at
.git/hooks/pre-commit, although we will look at that
file.
Why are Pre-Commit hooks so important?
You may be wondering why running hooks prior to commits is so
important. The short answer is that it reduces the feedback loop and
speeds up the pace of development. The long answer is that it only
really becomes apparent after using them so we’re going to have a go at
installing and enabling some pre-commit hooks on our code
base, making some changes and committing them.
Installation
pre-commit is written in Python but hooks are available that lint, check and test many languages other than Python. Many Linux systems have pre-commit in their package management systems so if you are using Linux or OSX you can install these at the system level.
However, for this course the setup instructions asked you to install
Miniconda and we
can install pre-commit
in a Conda environment to leverage it. The steps to do so are
- Create a Conda environment called
python-mathswithconda create -n python-maths python=3.11 - Activate the newly created
python-mathsenvironment. - Install
pre-commitin thepython-mathsrepository.
BASH
❱ conda create -n python-maths python=3.11 pre-commit
Retrieving notices: ...working... done
Collecting package metadata (current_repodata.json): done
Solving environment: done


==> WARNING: A newer version of conda exists. <==
  current version: 24.4.0
  latest version: 24.5.0

Please update conda by running

    $ conda update -n base -c defaults conda

Or to minimize the number of packages updated during conda update use

     conda install conda=24.5.0


## Package Plan ##

  environment location: /home/neil/miniconda3/envs/python-maths

  added / updated specs:
    - pre-commit
    - python=3.11


The following packages will be downloaded:

    package                    |            build
    ---------------------------|-----------------
    cffi-1.16.0                |  py311h5eee18b_1         313 KB
    distlib-0.3.8              |  py311h06a4308_0         456 KB
    openssl-3.0.13             |       h7f8727e_2         5.2 MB
    platformdirs-3.10.0        |  py311h06a4308_0          37 KB
    virtualenv-20.26.1         |  py311h06a4308_0         3.5 MB
    ------------------------------------------------------------
                                           Total:         9.5 MB

The following NEW packages will be INSTALLED:

  _libgcc_mutex      pkgs/main/linux-64::_libgcc_mutex-0.1-main
  _openmp_mutex      pkgs/main/linux-64::_openmp_mutex-5.1-1_gnu
  bzip2              pkgs/main/linux-64::bzip2-1.0.8-h5eee18b_6
  ca-certificates    pkgs/main/linux-64::ca-certificates-2024.3.11-h06a4308_0
  cffi               pkgs/main/linux-64::cffi-1.16.0-py311h5eee18b_1
  cfgv               pkgs/main/linux-64::cfgv-3.4.0-py311h06a4308_0
  distlib            pkgs/main/linux-64::distlib-0.3.8-py311h06a4308_0
  filelock           pkgs/main/linux-64::filelock-3.13.1-py311h06a4308_0
  identify           pkgs/main/linux-64::identify-2.5.5-py311h06a4308_0
  ld_impl_linux-64   pkgs/main/linux-64::ld_impl_linux-64-2.38-h1181459_1
  libffi             pkgs/main/linux-64::libffi-3.4.4-h6a678d5_1
  libgcc-ng          pkgs/main/linux-64::libgcc-ng-11.2.0-h1234567_1
  libgomp            pkgs/main/linux-64::libgomp-11.2.0-h1234567_1
  libstdcxx-ng       pkgs/main/linux-64::libstdcxx-ng-11.2.0-h1234567_1
  libuuid            pkgs/main/linux-64::libuuid-1.41.5-h5eee18b_0
  ncurses            pkgs/main/linux-64::ncurses-6.4-h6a678d5_0
  nodeenv            pkgs/main/linux-64::nodeenv-1.7.0-py311h06a4308_0
  openssl            pkgs/main/linux-64::openssl-3.0.13-h7f8727e_2
  pip                pkgs/main/linux-64::pip-24.0-py311h06a4308_0
  platformdirs       pkgs/main/linux-64::platformdirs-3.10.0-py311h06a4308_0
  pre-commit         pkgs/main/linux-64::pre-commit-3.4.0-py311h06a4308_1
  pycparser          pkgs/main/noarch::pycparser-2.21-pyhd3eb1b0_0
  python             pkgs/main/linux-64::python-3.11.9-h955ad1f_0
  pyyaml             pkgs/main/linux-64::pyyaml-6.0.1-py311h5eee18b_0
  readline           pkgs/main/linux-64::readline-8.2-h5eee18b_0
  setuptools         pkgs/main/linux-64::setuptools-69.5.1-py311h06a4308_0
  sqlite             pkgs/main/linux-64::sqlite-3.45.3-h5eee18b_0
  tk                 pkgs/main/linux-64::tk-8.6.14-h39e8969_0
  tzdata             pkgs/main/noarch::tzdata-2024a-h04d1e81_0
  ukkonen            pkgs/main/linux-64::ukkonen-1.0.1-py311hdb19cb5_0
  virtualenv         pkgs/main/linux-64::virtualenv-20.26.1-py311h06a4308_0
  wheel              pkgs/main/linux-64::wheel-0.43.0-py311h06a4308_0
  xz                 pkgs/main/linux-64::xz-5.4.6-h5eee18b_1
  yaml               pkgs/main/linux-64::yaml-0.2.5-h7b6447c_0
  zlib               pkgs/main/linux-64::zlib-1.2.13-h5eee18b_1


Proceed ([y]/n)?

...

❱ conda activate python-maths
(python-maths) ❱ pre-commit install
pre-commit installed at .git/hooks/pre-commit
Callout
Examples of installing pre-commit at the system level for
different Linux systems or OSX. Note you will need to have
root access to install packages on your Linux system.
BASH
# Arch Linux
❱ pacman -Syu pre-commit
# Gentoo
❱ emerge -av pre-commit
# Debin/Ubuntu
❱ apt-get install pre-commit
# OSX Homebrew
❱ brew install pre-commit
The advantage of this is that you will be able to
pre-commit install in any repository without first having
to activate a virtual environment.
Challenge 2 - Checking out the installed
pre-commit hook
We have just installed pre-commit locally in the
python-maths repository lets see what it has done.
- What will the message say if
pre-commitcan not be found by thepre-commithook? (Hint - look for the line that starts withecho)
We can look at the .git/hooks/pre-commit file that we
were told was installed.
BASH
❱ cat .git/hooks/pre-commit
#!/usr/bin/env bash
# File generated by pre-commit: https://pre-commit.com
# ID: 138fd403232d2ddd5efb44317e38bf03

# start templated
INSTALL_PYTHON=/home/neil/miniconda3/envs/python-maths/bin/python
ARGS=(hook-impl --config=.pre-commit-config.yaml --hook-type=pre-commit)
# end templated

HERE="$(cd "$(dirname "$0")" && pwd)"
ARGS+=(--hook-dir "$HERE" -- "$@")

if [ -x "$INSTALL_PYTHON" ]; then
    exec "$INSTALL_PYTHON" -mpre_commit "${ARGS[@]}"
elif command -v pre-commit > /dev/null; then
    exec pre-commit "${ARGS[@]}"
else
    echo '`pre-commit` not found.  Did you forget to activate your virtualenv?' 1>&2
    exit 1
fi
We see that near the end a message is echo that prints
what follows to the terminal so if we get to that point the sentence
“pre-commit not found. Did you forget to activate your
virtualenv?” will be printed.
Configuring pre-commit
pre-commit needs configuring and this is done via the
.pre-commit-config.yaml file that lives at the root
(top-level) of your repository. The python-maths repository
already includes such a file so you will have a copy in your local
clone.
BASH
repos:
  - repo: https://github.com/pre-commit/pre-commit-hooks
    rev: v4.5.0 # Use the ref you want to point at
    hooks:
      - id: check-case-conflict
      - id: check-docstring-first
      - id: check-merge-conflict
      - id: check-toml
      - id: check-yaml
      - id: debug-statements
      - id: end-of-file-fixer
        types: [python]
      - id: fix-byte-order-marker
      - id: name-tests-test
        args: ["--pytest-test-first"]
      - id: no-commit-to-branch # Protects main/master by default
      - id: requirements-txt-fixer
      - id: trailing-whitespace
        types: [python, yaml, markdown]

  - repo: https://github.com/DavidAnson/markdownlint-cli2
    rev: v0.11.0
    hooks:
      - id: markdownlint-cli2
        args: []

  - repo: https://github.com/asottile/pyupgrade
    rev: v3.15.0
    hooks:
      - id: pyupgrade
        args: [--py38-plus]

  - repo: https://github.com/pre-commit/mirrors-mypy
    rev: v1.8.0
    hooks:
      - id: mypy

  - repo: https://github.com/astral-sh/ruff-pre-commit
    # Ruff version.
    rev: v0.4.2
    hooks:
      - id: ruff
        args: [--fix, --exit-non-zero-on-fix, --show-fixes]

  - repo: https://github.com/psf/black-pre-commit-mirror
    rev: 23.12.1
    hooks:
      - id: black
        types: [python]
        additional_dependencies: ["click==8.0.4"]
        args: ["--extend-exclude", "topostats/plotting.py"]
      - id: black-jupyter

  - repo: https://github.com/adamchainz/blacken-docs
    rev: 1.16.0
    hooks:
      - id: blacken-docs
        additional_dependencies:
          - black==22.12.0

  - repo: https://github.com/codespell-project/codespell
    rev: v2.2.6
    hooks:
      - id: codespell

  - repo: https://github.com/pre-commit/mirrors-prettier
    rev: v4.0.0-alpha.8
    hooks:
      - id: prettier

  - repo: https://github.com/numpy/numpydoc
    rev: v1.6.0
    hooks:
      - id: numpydoc-validation
        exclude: |
          (?x)(
              tests/|
              docs/
          )

  - repo: local
    hooks:
      - id: pylint
        args: ["--rcfile=.pylintrc"]
        name: Pylint
        entry: python -m pylint
        language: system
        files: \.py$
This YAML file might look quite complex and intimidating if you are not familiar with the format so we’ll go through it in sections.
repos:
The top-level section repos: defines a list of the
repositories that are included and each of these is a specific
pre-commit hook that will be used and run when commits are
made. In YAML list entries start with a dash (-).
- repo: https://github.com/<USER_OR_ORG>/<REPOSITORY>
Each repo is then defined, the first line states where
the repository is hosted and these are typically, although not always on
GitHub. The first one is for
pre-commit-hooks that come from the developers of
pre-commit itself. Other configured repositories are
markdownlint-cli2pyupgrademypyruffblackblack-jupyterblacken-docscodespellprettier-
local- which runspylintlocally.
rev:
The next line indicates the revision of the repo that you wish to
use. These are typically git tags that have been applied to
releases of the hook. In this example the revision is 4.5.0
for the pre-commit-hooks.
hooks:
There then follows another entry called hooks: which
defines a list of - id: and each of these is the name of a
particular hook that will be run. There are hooks enabled for the
following and they are fairly explanatory but the hooks page often has a one-line
explanation of what the hooks enable.
check-case-conflictcheck-docstring-firstcheck-merge-conflictcheck-tomlcheck-yamldebug-statementsend-of-file-fixerfix-byte-order-markername-tests-testno-commit-to-branchrequirements-txt-fixertrailing-whitespace
Some of the hooks have additional arguments (args:)
which are arguments that are passed to that particular hook or types
(types) which restrict the type of files the hook should
run on.
Callout
You can add comments to YAML file by pre-fixing them with a
#. These may be at the start of a line or can be added to
the end of a line and the text that follows will be treated as a comment
and ignored when parsing the file.
Understanding
.pre-commit-config.yaml
Now that we’ve gone through the structure of how a
pre-commit repository is defined and configured lets look
at some of the others that are defined.
Using grep to search
for the numpydoc string in the
.pre-commit-config.yaml we can hone in on the
repo and its associated rev.
BASH
❱ grep -A1 numpydoc .pre-commit-config.yaml  | grep -B1 rev
  - repo: https://github.com/numpy/numpydoc
    rev: v1.6.0
We see that it is v1.6.0 that is currently configured
for numpydoc.
Searching for the black-pre-commit-mirror in the
configuration and then looking for the id shows us what
hooks are configured for this repi.
BASH
❱ grep -A10 "black-pre-commit-mirror" .pre-commit-config.yaml | grep "id:"
      - id: black
      - id: black-jupyter
The black and black-jupyter hooks are
enabled. These will apply black
formatting to Python files and Jupyter Notebooks.
Finally searching for ruff in
.pre-commit-config.yaml and then looking for the
args field we can find out what arguments are passed to the
ruff linter.
BASH
❱ grep -A5 ruff .pre-commit-config.yaml | grep "args:"
        args: [--fix, --exit-non-zero-on-fix, --show-fixes]
The --fix, --exit-non-zero-on-fix and
--show-fixes options are enabled.
Installing pre-commit hooks
The .git/hooks/pre-commit is a Bash script that runs
pre-commit but where do the hooks come from? There is a
hint in the configuration file where each - repo: is
defined which points to a Git repository which contains the code and
environment to run the hook.
These need downloading and initialising before they will run on your
local system and that is achieved using
pre-commit install-hooks.
The repos that are defined need installing, this is done once and
sets up some virtual environments which are reused across Git
repositories that have pre-commit installed. If the
ref: is changed or updated then it will require downloading
a new environment.
Running pre-commit
Whilst configured as a hook to run before commits
pre-commit can be run at any time against the whole
repository
…or on individual files, in this case pyproject.toml and
README.md
If there are problems identified with any of the files
pre-commit will report them and you will have to fix them
and include the changes, staging before committing them (remember not to
commit to the wrong branch such as main).
Adding Hooks
Which hooks you use will depend largely on the language you are using
but there are hundreds of hooks available and these can be browsed at
the website. The
python-maths repository has a number of pre-commit-hooks
enabled but lets add some more.
Looking at the pre-commit-hooks
repo we can see there are a few hooks that we could enable. We will
create a new branch to make these changes on and add the
detect-private-keys, and prevent files larger than 800kb
from being added using the check-added-large-files
hook.
Add the following - id: to the hooks:
section defined under the first - repo:.
It can help with readability if you order the hooks alphabetically so you may have something that reads like the following.
YAML
repos:
  - repo: https://github.com/pre-commit/pre-commit-hooks
    rev: v4.5.0 # Use the ref you want to point at
    hooks:
      - id: check-added-large-files
        args: ["--maxkb=800"]
      - id: check-case-conflict
      - id: check-docstring-first
      - id: check-merge-conflict
      - id: check-toml
      - id: check-yaml
      - id: debug-statements
      - id: detect-private-keys
      - id: end-of-file-fixer
        types: [python]
      - id: fix-byte-order-marker
      - id: name-tests-test
        args: ["--pytest-test-first"]
      - id: no-commit-to-branch # Protects main/master by default
      - id: requirements-txt-fixer
      - id: trailing-whitespace
        types: [python, yaml, markdown]
After you have made changes to .pre-commit-config.yaml
you have to stage them for committing, if you don’t the
pre-commit programme will complain about it being
unstaged.
BASH
❱ cd python-maths
❱ git commit --allow-empty -m "Trying to commit without staging .pre-commit-config.yaml"
[ERROR] Your pre-commit configuration is unstaged.
`git add .pre-commit-config.yaml` to fix this.
Whenever you modify, add or delete content to
.pre-commit-configy.yaml you must therefore stage and
commit the changes (NB make sure youre are)
BASH
❱ git add .pre-commit-config.yaml
❱ git commit -m "pre-commit : Exclude large files and detect private keys"
❱ git push --set-upstream origin ns-rse/add-pre-commit-hooks
Challenge 6: Add the
forbid-new-submodules hook id to the
pre-commit-hooks configuration
The following line should be added under the hooks:
section of the
- repo: https://github.com/pre-commit/pre-commit-hooks
repository configuration.
The file should then be staged, committed and pushed.
Adding repos
The definitive list of
pre-commit repos is maintained on the official website.
Each entry links to the GitHub repository and most contain in their
README.md instructions on how to use the hooks.
Challenge 7: Add the numpydoc
repo, exclude the tests/ and doc/ directories
and run it against the code base
The numpydoc repo
defines hooks that check the Python docstrings conform to the Numpydoc
style guide. Following the instructions add the repo to the
.pre-commit-config.yaml (on a new branch)
Create a branch to undertake the work on.
The following should be added to your
.pre-commit-config.yaml
YAML
   - repo: https://github.com/numpy/numpydoc
     rev: v1.6.0
     hooks:
       - id: numpydoc-validation
         exclude: |
           (?x)(
               tests/|
               docs/
           )
Check that the code base passes the checks, correct any errors that are highlighted.
The file should then be staged, committed and pushed.
Local repos
Local repo are those that do not use hooks defined by others and are instead defined by the user. This comes in handy when you want to run checks which have dependencies that are specific to the code such as running pylint which needs to import all the dependencies that are used or run a test suite.
The python-maths module already has a section defined
that runs pylint locally. When running on a repository it
will therefore be essential that you have a virtual/conda environment
activated that has all the dependencies installed.
YAML
   - repo: local
     hooks:
       - id: pylint
         args: ["--rcfile=.pylintrc"]
         name: Pylint
         entry: python -m pylint
         language: system
         files: \.py$
Several of the configuration options we have already seen such as
id, args and files but the
name: field gives the hook a name and the
entry: defines what is actually run, in this case
python -m pylint which will take the define argument
--rcfile=.pylintrc, and so what actually gets executed
is
Callout
The .pylintrc file is a configuration file for
pylint that defines what checks are made.
Challenge 9: Define local
pre-commit repo to run a pytest hook
The python-maths repository has a suite of tests that
can be run to ensure the code works as expected.
Pytest is run simply with pytest.
Create a branch to undertake the work on.
The following should be added to your
.pre-commit-config.yaml
Check that the code base passes the checks, correct any errors that are highlighted.
The file should then be staged, committed and pushed.
Keeping pre-commit tidy
pre-commit downloads and installs lots of code on your
behalf, including virtual environments that are activated to run the
tests. It stores these in the ~/.cache/pre-commit/
directory and you will find a few common files (.lock,
db.db and README) along with a bunch of
directories with hashed names. These directories are the code and
environments used to run the different hooks.
Over time and across multiple projects the size of this cache directory can grow so its good practice to periodically tidy up and there are two commands for doing so, which you should run periodically.
Cleaning and Garbage Collection
The pre-commit clean command will clean out files that
have been left around periodically, these tend not to be too large so
are less of a problem.
Cached virtual environments can grow to be quite large though, but
they can be easily tidied up using the pre-commit gc
command (gc stands for Garbage Collection.
Going further
Despite the name pre-commit actually supports hooks at
many different stages stages.
Whether these run will depend on where they are defined to run in the
.pre-commit-hooks.yaml of the repo you are using, but they
can also be over-ridden locally by setting the stages.
There are also top-level
configuration options where you can set a global file include
(files: "<pattern>") and exclude
(exclude: "<pattern>") pattern which would apply
across all configured repositories.
ci:
There is one section of the configuration which we haven’t covered
yet, the ci: section defined at the bottom. This controls
how pre-commit runs and is used in Continuous Integration
which is the topic of our next chapter.
We’ve seen how hooks and in particular the pre-commit suite can be used to
automate many tasks such as running linting checks on your code base
prior to commits. A short coming of this approach is that whilst the
configuration file (.pre-commit-config.yaml) may live in
your repository it means that every person contributing to the code has
to install the hooks and ensure they run locally.
Not everyone who contributes to your code will do this that is where pre-commit.ci comes in handy as it runs the Pre-commit hooks as part of the Continuous Integration on GitHub which is the focus of the next episode.
Key Points
- Hooks are actions run by Git before or after particular events such
as
commit,pushandpullvia scripts. - They are defined in Bash scripts in the
.git/hooksdirectory. - The
pre-commitframework provides a wealth of hooks that can be enabled to run, by default, before commits are made. - Each hook can be configured to run on specific files, or to take additional arguments.
- Local hooks can be configured to run when dependencies that will only be found on your system/virtual environment are required.
- Use hooks liberally as you develop your code locally, they save you time.
Content from Continuous Integration
Last updated on 2024-05-23 | Edit this page
Overview
Questions
- How can I get a computer to automate tasks?
- How do I shorten the feedback loop when developing code?
- How can I use GitHub Actions/GitLab CI?
Objectives
- Use and configure Pre-commit.ci
- Use Continuous Integration to have computers run checks and tests automatically.
- Building Websites with Actions
- Running actions locally
Continuous What?
We’ve seen how to run hooks locally and automatically in relation to events in the Git cycle, but it is also possible, and indeed desirable, to run hooks automatically on GitHub in response to different events. This is known as Continuous Integration or Continuous Delivery depending on the actions taken and their effects.
Examples of actions that might be undertaken in this manner include…
- Running the test suite for a package.
- Building and deploying a website.
- Building the software package and deploying it to the package repository (e.g. PyPI or CRAN).
- Uploading archives of work to a Figshare repository such as ORDA
- Running pre-commit checks online.
The list of options is vast and there are whole ecosystems for the different Forge’s as we shall discover.
GitHub Actions
GitHub makes available a series of Virtual Machines in the cloud to undertake the tasks that you wish to perform via GitHub Actions. These define the events which will run, the conditions under which they will run and can call other actions that have been developed and shared by others on their repositories or even in the Actions Marketplace.
Configuration
Configuration of actions that run in GitHub is via YAML files that reside in
.github/workflows/.
Callout
Quite why the directory isn’t .github/actions/ is a
mystery as it would align better.
The terms terms “workflow” and “action” may be used interactively
when teaching the material but every effort has been made in the written
material to use the term action when unless specifically
referring to the directory.
Lets take a look at the structure of the existing actions define in
the .github/workflow directory of the python-maths
repository we have been working with.
BASH
ls -lha .github/workflows/
drwxr-xr-x neil neil 4.0 KB Sat Feb 17 07:28:30 2024 .
drwxr-xr-x neil neil 4.0 KB Sat Feb 17 07:28:30 2024 ..
.rw-r--r-- neil neil 639 B Sat Feb 17 07:28:30 2024 test-python-package.yamlThere is just one file in this directory
test-python-package.yaml, we can use
cat .github/workflows/test-python-package.yaml to
concatenate the file and see its contents.
YAML
name: Python package

on:
  push:
    branches: main
  pull_request:
    branches: main

jobs:
  tests:
    name: Tests (${{ matrix.os }}, ${{ matrix.python-version }})
    runs-on: ${{ matrix.os }}
    strategy:
      fail-fast: false
      matrix:
        os: ["ubuntu-latest", "macos-latest", "windows-latest"]
        python-version: [3.10, 3.11, 3.12]

    steps:
      - uses: actions/checkout@v4
      - name: Set up Python ${{ matrix.python-version }}
        uses: actions/setup-python@v5
        with:
          python-version: ${{ matrix.python-version }}
      - name: Install dependencies
        run: |
          python -m pip install --upgrade pip
          python -m pip install .[dev,tests]
      - name: Test with pytest
        run: |
          pytest
Callout
YAML (which stands for YAML Ain’t Markup Language) is a common format for defining hierarchical data structures. It is a super-set of JSON (JavaScript Object Notation) that many find more flexible (in part because of the ability to have comments) and is regularly used for configuration files.
Fields
The syntax defined in the Workflow
-
name: defines the name of the Action. -
on: defines the events the Action will be run on, here you can see that it will be run on bothpushevents andpull_requestwhich occur on themainbranch. -
jobs: this defines the jobs that are undertaken and is a bit more complex.-
tests: this is the name of the job that is subsequently defined, here it istestsbecause the section defines running the tests.-
name: The name for the test, this is a combination of the subsequentmatrix.osandmatrix.python-version -
runs-on: defines the operating system/virtual machine that will be used to run the job, here it is set toubuntu-latestand will use the most recent Ubuntu image available. -
strategy: defines how the job will run, it has two sub-settings.-
fail-fast: Currently set tofalse, but iftruethen any step failing cancels all other jobs in the defined matrix. -
matrix: This is a neat way of defining more than one operating system, and in this case Python version on which to run the tests under. These combine to increase the number of virtual machines that are spun up and the tests are run under.-
os: defines the operating system on which to run the tests, there are many available, including older versions of each. -
python-version: defines which Python versions to run the tests under.
-
-
-
steps: Defines the different steps that will be run on each virtual machine.-
uses: This first instance uses theactions/checkout@v4which is an action provided by GitHub that checks out the repository the workflow belongs to. You will want to include this as the first step in almost all of your actions. -
name: A description of the next step, in this case Set up Python -
uses: Runs theactions/setup-python@v5which will install Python, which version is defined under thewiththat follows. -
with: Defines what version of the following items to use.-
python-version: Uses one of the Python versions defined above undermatrix.python-version
-
-
name: The next step is to Install dependencies -
run: This step defines shell commands that are run, by virtue of the vertical bar (|), each command you wish to run should be on its own line. These next two lines upgradepipthe programme that installs Python packages and then installs the cloned package from the current directory, along with all dependencies, including those required fordevandtests. -
name: The last step is to Test with pytest and runs the tests. -
run: Another short shell command that runs the tests by invokingpytestwhich will have been installed as one of the dependencies in the previous step.
-
-
-
Actions…in Action
Earlier in the course you will have made Pull Requests and merged
changes into the main branch. These will have triggered
actions and we can now go and look at the log-files from running those
actions.
In the GitHub repository of python-maths that you are
collaborating on navigate to the Actions tab and you should see
a list of actions listed.
MarketPlace
There are a lot of actions available that can be run in the
steps section of your custom action. The GitHub
Marketplace provides a central place to search for solutions so you
don’t have to reinvent the wheel.
Challenge 1: Add the Python Coverage GitHub
Action to python-maths
In your pairs add the Python
Coverage GitHub Action to the python-maths
repository.
Work together on the solution. Create GitHub issues and assign them and undertake the work on a new branch and make the following changes…
- Enable
pytestto create a coverage report to a file by adding--cov-report coverage.xml. - Run
coverageon that file withcoverage xml coverage.xmlin therun: |section. - Add the YAML section for
- name: Get Coverafter the section that runspytest.
After creating an issue and assigning it you can create a new branch with the following.
The configuration you need to add changes the call to
pytest to summarise coverage and output to a file and then
calls the coverage action using that file.
Pre-commit.ci
We saw in the Hooks episode how to use pre-commit hooks to run certain tasks prior to making commits to your feature branch. pre-commit.ci extends this and uses the same configured hooks to automatically check that code submitted in Pull Requests passes these same checks.
This can be useful to capture instances where pre-commit
may have been disabled locally or if you receive contributions from
outside of the core development team and contributor has not enabled
pre-commit in their local workflow as it will run the
formatting and linting tests, correct where possible and make commits
directly to the branch in the Pull Request and inform if there were
errors that could not be automatically corrected.
Setup
To get setup with pre-commit.ci navigate to the page and use the button to Sign In With GitHub. Once you have logged in select your profile and click on the Manage repos on GitHub link. You may be asked to complete your two-factor-authentication (2FA) at this point, but you should be taken to your accounts settings page (you can always navigate there using Settings > Applications). By default pre-commit.ci requires
- Read access to issues, merge queues and metadata.
- Read and write access to code, commit statuses, pull requests and workflows.
There are then two potions for Repository access you can either grant access to all repositories that you own, or you can select specific repositories. It is generally preferable to only allow access to specific repositories. The dialog that appears allows you to search for a repository that you wish to grant access to.
Configuration
You can configure the behaviour of pre-commit.ci via the
.pre-commit-config.yaml. The full specification is detailed
in the documentation
and is shown below.
YAML
ci:
    autofix_commit_msg: |
        [pre-commit.ci] auto fixes from pre-commit.com hooks

        for more information, see https://pre-commit.ci
    autofix_prs: true
    autoupdate_branch: ''
    autoupdate_commit_msg: '[pre-commit.ci] pre-commit autoupdate'
    autoupdate_schedule: weekly
    skip: []
    submodules: false
Challenge 2: Add pre-commit.ci to your
python-maths repository
In your pairs add an appropriate configuration section the
.pre-commit-config.yaml on a new branch on the
python-maths repository push the changes to GitHub and make
a Pull Request.
Set the autoupdate_schedule to monthly and
customise both autofix_commit_msage and
autoupdate_commit_msg fields.
Finally configure the pylint hook to be skipped in
pre-commit.ci.
You are free to use the pre-commit.ci documentation to help guide you.
Key Points
Continuous Integration/Delivery is a useful method of checking code before it enters the
mainbranch.GitHub uses Actions that are defined by YAML configuration files under
.github/workflow/.Actions can be restricted to events/branches/tags.
pre-commit.ci allows integration of pre-commit hooks in GitHub Actions.
Content from Additional Topics
Last updated on 2024-08-02 | Edit this page
Some additional topics that extend working with branches and the process of reviewing.
Worktrees instead of Branches
Sometimes you will want to switch between branches that are all in development in the middle of work. If you’ve made changes to files that you have not saved and committed Git will tell you that the changes made to your files will be over-written if they differ from those on the branch you are switching to and it will refuse to switch branches.
This means either making a commit or as we’ve just seen stashing the
work to come back to at a later date. Neither of these are particularly
problematic as you can git pop stashed work to restore it
or git commit --amend, or git commit --fixup
and squash commits to maintain small atomic commits and avoid cluttering
up the commit history with commits such as “Saving work to review
another branch” (more on this in the next episode!). But, perhaps
unsurprisingly, Git has another way of helping your workflow in this
situation. Rather than having branches you can use
“worktrees”.
Normally when you’ve git clone’d a repository all
configuration files for working with the repository are saved to the
repository directory under .git and all files in
their current state on the main branch are also copied to
the repository directory. If we clone the pytest-examples
directory we can look at its contents using tree -afHD -L 2
(this limits the depth as we don’t need to look deep inside the
.git or mypy directories which contain lots of
files).
BASH
git clone git@github.com:ns-rse/pytest-examples.git
cd pytest-examples
tree -afhD -L 2
[4.0K Mar 11 07:26]  .
├── [ 52K Jan  5 11:26]  ./.coverage
├── [4.0K Mar 11 07:26]  ./.git
│   ├── [ 749 Jan  5 11:30]  ./.git/COMMIT_EDITMSG
│   ├── [ 394 Jan  5 11:28]  ./.git/COMMIT_EDITMSG~
│   ├── [ 479 Feb 17 14:08]  ./.git/config
│   ├── [ 556 Feb 17 14:06]  ./.git/config~
│   ├── [  73 Jan  1 13:24]  ./.git/description
│   ├── [ 222 Mar 11 07:26]  ./.git/FETCH_HEAD
│   ├── [  21 Mar 11 07:26]  ./.git/HEAD
│   ├── [4.0K Jan  1 13:27]  ./.git/hooks
│   ├── [1.3K Mar 11 07:26]  ./.git/index
│   ├── [4.0K Jan  1 13:24]  ./.git/info
│   ├── [4.0K Jan  1 13:24]  ./.git/logs
│   ├── [4.0K Mar 11 07:26]  ./.git/objects
│   ├── [  41 Mar 11 07:26]  ./.git/ORIG_HEAD
│   ├── [ 112 Jan  3 15:57]  ./.git/packed-refs
│   ├── [4.0K Jan  1 13:24]  ./.git/refs
│   └── [4.0K Jan  1 13:31]  ./.git/rr-cache
├── [4.0K Jan  2 11:52]  ./.github
│   └── [4.0K Jan  3 15:57]  ./.github/workflows
├── [3.0K Jan  2 12:06]  ./.gitignore
├── [1.0K Jan  1 13:24]  ./LICENSE
├── [ 293 Jan  2 12:06]  ./.markdownlint-cli2.yaml
├── [4.0K Jan  5 11:27]  ./.mypy_cache
│   ├── [ 12K Jan  5 11:28]  ./.mypy_cache/3.11
│   ├── [ 190 Jan  2 10:39]  ./.mypy_cache/CACHEDIR.TAG
│   └── [  34 Jan  2 10:39]  ./.mypy_cache/.gitignore
├── [1.7K Mar 11 07:26]  ./.pre-commit-config.yaml
├── [ 763 Jan  1 13:25]  ./.pre-commit-config.yaml~
├── [ 18K Jan  2 12:06]  ./.pylintrc
├── [4.8K Mar 11 07:26]  ./pyproject.toml
├── [4.7K Jan  1 17:36]  ./pyproject.toml~
├── [4.0K Jan  1 19:04]  ./.pytest_cache
│   ├── [ 191 Jan  1 19:04]  ./.pytest_cache/CACHEDIR.TAG
│   ├── [  37 Jan  1 19:04]  ./.pytest_cache/.gitignore
│   ├── [ 302 Jan  1 19:04]  ./.pytest_cache/README.md
│   └── [4.0K Jan  1 19:04]  ./.pytest_cache/v
├── [4.0K Mar 11 07:26]  ./pytest_examples
│   ├── [1.3K Mar 11 07:26]  ./pytest_examples/divide.py
│   ├── [ 179 Mar 11 07:26]  ./pytest_examples/__init__.py
│   ├── [4.0K Jan  5 11:18]  ./pytest_examples/__pycache__
│   ├── [ 491 Mar 11 07:26]  ./pytest_examples/shapes.py
│   └── [ 390 Jan  2 13:34]  ./pytest_examples/shapes.py~
├── [4.0K Jan  2 16:09]  ./pytest_examples.egg-info
│   ├── [   1 Jan  2 16:09]  ./pytest_examples.egg-info/dependency_links.txt
│   ├── [3.1K Jan  2 16:09]  ./pytest_examples.egg-info/PKG-INFO
│   ├── [ 481 Jan  2 16:09]  ./pytest_examples.egg-info/requires.txt
│   ├── [ 446 Jan  2 16:09]  ./pytest_examples.egg-info/SOURCES.txt
│   └── [  16 Jan  2 16:09]  ./pytest_examples.egg-info/top_level.txt
├── [ 602 Jan  3 15:57]  ./README.md
├── [   0 Jan  1 13:31]  ./README.md~
├── [4.0K Jan  1 13:30]  ./.ruff_cache
│   ├── [4.0K Jan  2 11:57]  ./.ruff_cache/0.1.8
│   ├── [  43 Jan  1 13:30]  ./.ruff_cache/CACHEDIR.TAG
│   └── [   1 Jan  1 13:30]  ./.ruff_cache/.gitignore
├── [4.0K Mar 11 07:26]  ./tests
│   ├── [ 681 Mar 11 07:26]  ./tests/conftest.py
│   ├── [  26 Jan  2 12:11]  ./tests/conftest.py~
│   ├── [4.0K Jan  5 11:26]  ./tests/__pycache__
│   ├── [1.7K Mar 11 07:26]  ./tests/test_divide.py
│   ├── [1.6K Mar 11 07:26]  ./tests/test_shapes.py
│   └── [   0 Jan  2 13:36]  ./tests/test_shapes.py~
└── [ 460 Jan  2 16:09]  ./_version.py

21 directories, 43 files
The Worktree
Worktrees take a different approach to organising branches. They
start with a --bare clone of the repository which implies
the --no-checkout flag and means that the files that would
normally be found under the <repository>/.git
directory are copied but are instead placed in the top level of the
directory rather than under .git/. No tracked files are
copied as they may conflict with these files. You have all the
information Git has about the history of the repository and the
different commits and branches but none of the actual
files.
NB If you don’t explicitly state a target directory
to clone to it will be the repository name suffixed with
.git, i.e. in this example
pytest-examples.git. I recommend sticking with the
convention of using the same repository name so will explicitly state
it.
BASH
cd ..
mv pytest-examples pytest-examples-orig-clone
git clone --bare git@github.com:ns-rse/pytest-examples.git pytest-examples
cd pytest-examples
tree -afhD -L 2
[4.0K Mar 13 07:45]  .
├── [ 129 Mar 13 07:45]  ./config
├── [  73 Mar 13 07:45]  ./description
├── [  21 Mar 13 07:45]  ./HEAD
├── [4.0K Mar 13 07:45]  ./hooks
│   ├── [ 478 Mar 13 07:45]  ./hooks/applypatch-msg.sample
│   ├── [ 896 Mar 13 07:45]  ./hooks/commit-msg.sample
│   ├── [4.6K Mar 13 07:45]  ./hooks/fsmonitor-watchman.sample
│   ├── [ 189 Mar 13 07:45]  ./hooks/post-update.sample
│   ├── [ 424 Mar 13 07:45]  ./hooks/pre-applypatch.sample
│   ├── [1.6K Mar 13 07:45]  ./hooks/pre-commit.sample
│   ├── [ 416 Mar 13 07:45]  ./hooks/pre-merge-commit.sample
│   ├── [1.5K Mar 13 07:45]  ./hooks/prepare-commit-msg.sample
│   ├── [1.3K Mar 13 07:45]  ./hooks/pre-push.sample
│   ├── [4.8K Mar 13 07:45]  ./hooks/pre-rebase.sample
│   ├── [ 544 Mar 13 07:45]  ./hooks/pre-receive.sample
│   ├── [2.7K Mar 13 07:45]  ./hooks/push-to-checkout.sample
│   ├── [2.3K Mar 13 07:45]  ./hooks/sendemail-validate.sample
│   └── [3.6K Mar 13 07:45]  ./hooks/update.sample
├── [4.0K Mar 13 07:45]  ./info
│   └── [ 240 Mar 13 07:45]  ./info/exclude
├── [4.0K Mar 13 07:45]  ./objects
│   ├── [4.0K Mar 13 07:45]  ./objects/info
│   └── [4.0K Mar 13 07:45]  ./objects/pack
├── [ 249 Mar 13 07:45]  ./packed-refs
└── [4.0K Mar 13 07:45]  ./refs
    ├── [4.0K Mar 13 07:45]  ./refs/heads
    └── [4.0K Mar 13 07:45]  ./refs/tags

9 directories, 19 files
What use is that? Well from this point you can instead of using
git branch use
git worktree add <branch_name> and it will create a
directory with the name of the branch which holds all the files
in their current state on that branch.
BASH
git worktree add main
Preparing worktree (checking out 'main')
HEAD is now at 2f7c382 Merge pull request #6 from ns-rse/ns-rse/tidy-print
tree -afhD -L 2 main/
[4.0K Mar 13 08:13]  main
├── [  64 Mar 13 08:13]  main/.git
├── [4.0K Mar 13 08:13]  main/.github
│   └── [4.0K Mar 13 08:13]  main/.github/workflows
├── [3.0K Mar 13 08:13]  main/.gitignore
├── [1.0K Mar 13 08:13]  main/LICENSE
├── [ 293 Mar 13 08:13]  main/.markdownlint-cli2.yaml
├── [1.7K Mar 13 08:13]  main/.pre-commit-config.yaml
├── [ 18K Mar 13 08:13]  main/.pylintrc
├── [4.8K Mar 13 08:13]  main/pyproject.toml
├── [4.0K Mar 13 08:13]  main/pytest_examples
│   ├── [1.3K Mar 13 08:13]  main/pytest_examples/divide.py
│   ├── [ 179 Mar 13 08:13]  main/pytest_examples/__init__.py
│   └── [ 491 Mar 13 08:13]  main/pytest_examples/shapes.py
├── [ 602 Mar 13 08:13]  main/README.md
└── [4.0K Mar 13 08:13]  main/tests
    ├── [ 681 Mar 13 08:13]  main/tests/conftest.py
    ├── [1.7K Mar 13 08:13]  main/tests/test_divide.py
    └── [1.6K Mar 13 08:13]  main/tests/test_shapes.py

5 directories, 14 files
Each branch can have a worktree added for it and then when you want
to switch between them its is simply a case of cding into
the worktree (/branch) you wish to work on. You use Git commands within
the worktree directory to apply them to that branch and Git keeps track
of everything in the usual manner.
Lets create two worktree’s, the contributing and
citation we created above when working with branches. If
you didn’t
BASH
cd ../
mv pytest-examples pytest-examples-orig-clone
git clone --bare git@github.com:ns-rse/pytest-examples.git pytest-examples
cd pytest-examples
git worktree add contributing
git worktree add citation
You are now free to move between worktrees (/branches) and undertake
work on each without having to git stash or
git commit work in progress. We can add the
CONTRIBUTING.md to the contributing worktree
then jump to the citation worktree and add the
CITATION.cff
BASH
cd contributing
echo "# Contributing\n\nContributions to this repository are welcome via Pull Requests." > CONTRIBUTING.md
cd ../citation
echo "cff-version: 1.2.0\ntitle: Pytest Examples\ntype: software" > CITATION.cff
Neither branches have had the changes committed so Git will not show
any differences between them, but we can use diff -qr to
compare the directories.
BASH
diff -qr contributing citation
Only in citation: CITATION.cff
Only in contributing: CONTRIBUTING.md
Files contributing/.git and citation/.git differ
If we commit the changes to each we can git diff
them.
BASH
cd contributing
git add CONTRIBUTING.md
git commit -m "Adding basic CONTRIBUTING.md"
cd ../citation
git add CITATION.cff
git commit -m "Adding basic CITATION.cff"
git diff citation contributing
CITATION.cff --- Text
1 cff-version: 1.2.0
2 title: Pytest Examples
3 type: software

CONTRIBUTING.md --- Text
1 # Contributing
2
3 Contributions to this repository are welcome via Pull Requests
NB The output of git diff may depend on
the difftool that you have configured, I use and recommend the brilliant
difftastic
which has easy integration with
Git.
Moving Worktrees
You can move worktrees to different directories, these do
not even have to be within the bare repository that you cloned
as Git keeps track of these in the worktrees/ directory
which has a folder for each of the worktrees you create and the file
gitdir points to the location of that particular
worktree.
BASH
cd pytest-examples   # Move to the bare repository
tree -afhD -L 2 worktrees
[4.0K Mar 13 09:27]  worktrees
├── [4.0K Mar 13 09:31]  worktrees/citation
│   ├── [  26 Mar 13 09:31]  worktrees/citation/COMMIT_EDITMSG
│   ├── [   6 Mar 13 09:27]  worktrees/citation/commondir
│   ├── [  55 Mar 13 09:27]  worktrees/citation/gitdir
│   ├── [  25 Mar 13 09:27]  worktrees/citation/HEAD
│   ├── [1.4K Mar 13 09:31]  worktrees/citation/index
│   ├── [4.0K Mar 13 09:27]  worktrees/citation/logs
│   ├── [   0 Mar 13 09:31]  worktrees/citation/MERGE_RR
│   ├── [  41 Mar 13 09:27]  worktrees/citation/ORIG_HEAD
│   └── [4.0K Mar 13 09:27]  worktrees/citation/refs
├── [4.0K Mar 13 09:30]  worktrees/contributing
│   ├── [  29 Mar 13 09:30]  worktrees/contributing/COMMIT_EDITMSG
│   ├── [   6 Mar 13 09:27]  worktrees/contributing/commondir
│   ├── [  59 Mar 13 09:27]  worktrees/contributing/gitdir
│   ├── [  29 Mar 13 09:27]  worktrees/contributing/HEAD
│   ├── [1.4K Mar 13 09:30]  worktrees/contributing/index
│   ├── [4.0K Mar 13 09:27]  worktrees/contributing/logs
│   ├── [   0 Mar 13 09:30]  worktrees/contributing/MERGE_RR
│   ├── [  41 Mar 13 09:27]  worktrees/contributing/ORIG_HEAD
│   └── [4.0K Mar 13 09:27]  worktrees/contributing/refs
└── [4.0K Mar 13 08:13]  worktrees/main
    ├── [   6 Mar 13 08:13]  worktrees/main/commondir
    ├── [  51 Mar 13 08:13]  worktrees/main/gitdir
    ├── [  21 Mar 13 08:13]  worktrees/main/HEAD
    ├── [1.3K Mar 13 08:13]  worktrees/main/index
    ├── [4.0K Mar 13 08:13]  worktrees/main/logs
    ├── [  41 Mar 13 08:13]  worktrees/main/ORIG_HEAD
    └── [4.0K Mar 13 08:13]  worktrees/main/refs

10 directories, 19 files
If we look at the gitdir file in each
worktree sub-directory we see where they point to.
BASH
cat worktrees/*/gitdir
/mnt/work/git/hub/ns-rse/pytest-examples/citation/.git
/mnt/work/git/hub/ns-rse/pytest-examples/contributing/.git
/mnt/work/git/hub/ns-rse/pytest-examples/main/.git
These mirror the locations reported by
git worktree list, albeit with .git
appended.
If you want to move a worktree you can do so, here we move
citation to ~/tmp.
Not Breaking Things During Rebasing
As you rebase your branch you can make sure that you don’t break any
of your code by running tests at each step. This is achieved using the
-x switch which will execute the command that follows. The
example below would run pytest at each step of the
git rebase and if tests fail you can fix them.
Constructive Reviewing
Working collaboratively invariably involves reviewing pull/merge requests made by others. This is not something you should be afraid or anxious about undertaking as its a good opportunity to learn. Whether your work is being reviewed or you are reviewing others reading other people’s code is an excellent way of learning.
Code Review Tutorial
Code-Review.org is an online tutorial to help you learn and improve how to undertake code reviews. It is an interactive self-paced learning resource that you can work through with the goals of…
- Becoming a better reviewer and consider your method of communication, constructive and actionable criticism.
- Be more comfortable having your code reviewed, share early and often.
- Use code review as a collaboration tool for sharing knowledge so that everyone understands what changes are being made.
- Read more code! You will be encouraged to read the source code of the software and tools you regularly use, its a great way of learning.
- Enable more open source contributions and reviews.
Content from Further Resources
Last updated on 2024-10-04 | Edit this page
Overview
Questions
- Wow there is a lot I’m overwhelmed, will I ever know it all?
- How can I keep on learning more about Git?
- What material would you recommend?
Objectives
- Signpost some useful resources when you have more questions.
- Highlight RSS and Mastodon as useful ways to find out more about Git on a regular basis.
Will I Ever Know it All?

Probably not. There is simply too much to Git and associated tools like GitHub/GitLab and Pre-Commit to have any hope of knowing everything there is to about all aspects, and besides the tools, just like programming languages, evolve over time. That shouldn’t dishearten you from learning what you need to as you go.
How can I keep on learning more about Git?
Practise makes perfect, or so the saying goes, but in the case of computing it really is true, if you don’t practise using the tools or writing code you will not improve. Whilst you might not reach perfection you will become more proficient.
What material would you recommend?
This course is the result of the author(s) learning path which was not undertaken in isolation but a consequence of years of usage and a lot of reading. Below there are links to a number of references, blogs, videos and so forth for finding out more about Git, GitHub and so forth.
References
- Pro Git a comprehensive book about Git, very, very detailed.
- Learn Git - Tutorials, Workflows and Commands | Atlassian excellent resources from Atlassian their tutorials are clear and informative and inspired much of this course.
Videos
Former founder of GitHub and co-author of the excellent book Pro Git Scott Chacon is big on Git advocacy. His book and articles are well worth reading and his videos are worth watching too.
- So You Think You Know Git - Scott Chacon FOSDEM 2024 an excellent talk by one of the co-founders of GitHub.
- So You Think You Know Git (Part 2) - Scott Chacon DevWorld 2024 another excellent talk.
These are summarised in the following series of blog posts.
Blogs
RSS
Really Simply Syndication is a much under appreciated/used technology that makes it really simple to syndicate blog posts from a range of sources to give yourself a customised reading list rather than being at the whim of whatever is in your social media feeds when you happen to take a look at them.
Many of the blogs linked above have RSS feeds and whilst not all posts will be focused on Git you can sometimes get specific feeds for topics. I would highly recommend using RSS reader not just for improving your understanding of Git but all other research areas (e.g. Python, R, Open Research et.c) Some useful resources for RSS feeds are below.
- OpenRSS is a simple way of creating RSS feeds for sites, even if they don’t natively provided them.
- Feeder open source, private feed reader that runs on your Android device.
- Feedly web-based feed aggregator.
- FreshRSS a free, self-hostable feeds aggregator if you run your own websites.
- Tiny Tiny RSS another free, self-hostable feeds aggregator if you run your own websites.
Learning Resources
Various tutorials and tools that help explain how Git works.
- Git Better
- Oh Shit, Git!?!
- Oh My Git! - a game for learning Git.
- Explain Git with D3
- Learn Git Branching
- The Version Control Book
- Git & GitHub through GitKraken Client - From Zero to Hero
- git-sim : visually simulate Git operations in your own repos
- Git from the inside out
- Git School a visual sandbox/playground.
- Flight rules for git an excellent clear set of resources of how to solve different problems/scenarios.
Julia Evans (aka b0rk)
Julia Evans (aka b0rk) writes useful and insightful posts on different aspects of Git that help tackle fundamental but often misunderstood concepts.
- How HEAD works in git
- Popular git config options
- Dealing with diverged git branches
- Inside .git
- Do we think of git commits as diffs, snapshots, and/or histories?
- git branches: intuition & reality
- How git cherry-pick and revert use 3-way merge
- git rebase: what can go wrong?
- Confusing git terminology
- Some miscellaneous git facts
- In a git repository, where do your files live?
These have been compiled into two zines Oh shit, git! and How Git Works.
Scott Chacon
Former founder of GitHub and co-author of the excellent book Pro Git is big on Git advocacy. His videos and articles are well worth reading (as is his book).
General
- Little Things I Like to Do with Git – CSS Wizardry – Web Performance Optimisation
- Modern Git Commands and Features You Should Be Using
- Advanced Git Features You Didn’t Know You Needed
- unixorn/git-extra-commands: A collection of git utilities, useful extra git scripts, tutorials and other useful articles.
- Git as debugging tool - Lucas Seiki Oshiro
Commits
- Conventional Commits how to structure commit messages to be informative.
- Git Commit Patterns
- Write Better Commits, Build Better Projects - The GitHub Blog
Reviewing
- Code-Review.org - an online tutorial for code review.
- GitHub Pull Request Pitfalls
- Tidyteam code review principles (derived from How to do a Code Review).
- pyOpenSci Software Peer Review Guidebook
Internals
- Git’s database internals I : packed object store
- Git’s database internals II: commit history queries
- Git’s database internals III: file history queries
- Git’s database internals IV: distributed synchronization
- Git’s database internals V: scalability
- In a git repository, where do your files live?
- Git Concepts in Less than 10 minutes
Forges
- The GitHub Blog updates, ideas, and inspiration from GitHub.
- GitLab Blogs various categories of blogs from GitLab.
StackOverflow
You will likely have already come across StackOverflow already. Its a popular forum for asking and answering questions about almost any aspect of computing (with many subject specific sub-forums in StackExchange). It is worth creating an account here even if you never intend to ask questions as it is possible to bookmark questions and answers for future reference. Bookmarks can be organised into lists to make it easier to find specific topics.
When searching use the [<tag>] notation to search
for posts with specific tags, for example to search for posts tagged
with git you would include [git] in your
search terms, for github you would include
[github] and so on.
If you do ask questions try and provide as much information as possible in your question as to what you have tried (in terms of code and/or commands), the exact output (copy and paste) and format your post using Markdown to make it easier for people to read.
Also consider creating a minimal reproducible example to demonstrate your problem to others so they can recreate the problem, investigate where things have gone wrong and provide useful answers.
Mastodon
There are a lot of technical users who post their articles, ask
questions and help each other out about all sorts of languages and tools
on Mastodon. Join an instance and follow #git to keep
abreast of things and find out what others struggle with and how they
can be solved.
Fedi.Tips is a useful guide to
getting started with Mastodon and once you’re setup it can be useful to
use the Advanced
Web Interface and add a column for the #git tag. A good
Android client is Fedilab.